# IPK Groups

&#x20;Any member of the group can then pick up the call and action it.

You may define as many groups as you wish. When a group is updated, all analysts linked to this group will remain linked to the new group, that is, only the group name is changed.

IPK Groups can be assigned to individual analysts from the **IPK Groups** tab in their Person Details, or to **IPK Security Roles** which are in turn assigned to analysts from the tab in their Person Details.

## Creating an IPK Group

{% hint style="info" %}

### Before you start

You must have **Security Setup** selected in the Admin tab of your General Access security role to access the **Security** options within the System window.
{% endhint %}

1. Display the IPK Groups window if it is not already on screen.
2. Select the Menu button , then **Admin**, and then select **System Administration**. The System Administration window is displayed, with a menu of options available.&#x20;
3. In the Explorer pane, expand **Security**.
4. Select the **IPK Groups** option from the Explorer pane. The IPK Groups window appears, listing the existing IPK groups.
5. Select the New icon.
6. Complete the details as follows, scrolling across the window if necessary:

<table data-header-hidden><thead><tr><th width="220"></th><th></th></tr></thead><tbody><tr><td>Name</td><td>The name for the IPK group you want to create. This should be unique.</td></tr><tr><td>Email ID</td><td><p>The email address to be used as the group’s email address.</p><p>You can specify multiple email addresses for a group, separating them with semicolons.</p><p>If no email ID is given and <strong>Email Analysts</strong> is selected, individual Analysts will be emailed.</p><p>MMA URLs are not displayed in email messages sent to the group email address.</p></td></tr><tr><td>Email Analysts</td><td><p>Select this to automatically email individual Analysts when a call, request or task is forwarded to the group. If a group email address is given, the group and the Analysts within it will receive an email. MMA URLs will not be displayed in email messages sent to a group email address.</p><p>Analysts will only receive an email if email addresses are stored in their <strong>Person Details.</strong></p><p>If Email ID is left blank and this option is not selected, or the Analysts do not have valid email addresses held, no email is sent.</p></td></tr><tr><td>Pager ID</td><td>The pager number for the group. Only one number can be entered into this field. If text messages are being used, enter the mobile cellphone number.</td></tr><tr><td>Page Analysts</td><td>Select to send a pager message to the Analysts in the group when a call, request or task is forwarded to the group</td></tr><tr><td>Time Zone</td><td>Select a time zone for the group from the drop down list. By default, this is the time zone specified on the ASM Core server. This is useful if you want ASM Core to apply an Underpinning Contract (UC) to a call based on the time zone of the group associated with the Underpinning Contract.</td></tr><tr><td>Default Analyst</td><td>Select an user who will automatically be assigned ownership of calls forwarded to this group when Forced Call Ownership is enabled.</td></tr></tbody></table>

#### Below the table, there are further options relating to partitioning and recipients. Complete as follows:

<table data-header-hidden><thead><tr><th width="222"></th><th></th></tr></thead><tbody><tr><td>Allocate Partition(s) to Group</td><td><p>This is only enabled if the system is partitioned. Only partitions you have permissions to are displayed.</p><p>Allocate the group to as many partitions as necessary by selecting the tick box beside the appropriate partition(s) listed.</p><p>This enables:</p><ul><li>the group(s) to be assigned to analysts in matching partitions through their Person Details</li><li><p>the group(s) to appear in the Forward window of partitioned calls</p><p>If call details are not partitioned, all groups appear</p></li></ul></td></tr><tr><td>Escalation Recipients for Group (forward)</td><td><p>Identify the SLM notification recipients for calls, requests and tasks forwarded to the group. Different recipients can be selected for First call back, response, resolve (up to 3 levels of escalation) and action.</p><p>This option is only enabled if <strong>Assigned to Group</strong> is selected in <strong>Service Level Management Settings</strong></p></td></tr><tr><td>Escalation Recipients for Group (current)</td><td><p>Identify the SLM notification recipients for calls, requests and tasks that are currently owned by the group. Different recipients can be selected for First call back, response, resolve (up to 3 levels of escalation) and action.</p><p>This option is only enabled if <strong>Current Group</strong> is selected in the <strong>Service Level Management Settings</strong></p></td></tr></tbody></table>

Select  to save the changes. Provide the Change Reasons if prompted to do so.

<mark style="color:green;">**Once the group is defined, Analysts can then be allocated to it in their Person Details.**</mark>

### Identifying SLM Notification Recipients <a href="#identifying_slm_notification_recipients" id="identifying_slm_notification_recipients"></a>

You can configure analysts or groups to automatically receive notification of agreement escalation and breach events. The people receiving these notifications are known as **recipients**.

When creating an IPK or Workflow Group and selecting an agreement escalation or breach event, you can set up the recipients based on:

* Whether the group is the current owner of the call, request, or task at **Escalation Recipients for Group (current)**, or
* Whether the call, request, or task has been forwarded to the group, at **Escalation Recipients for Group (forward)**

**For IPK groups**, you can define recipients for the following events:

* First Call Back
* Response
* Resolve (includes up to 3 levels of escalation)
* Action

**For Workflow groups**, you can define recipients for the following events:

* Resolve (includes up to 3 levels of escalation)
* Action

Recipients are defined on the **Recipients** dialog box. This window can be accessed from many windows, including **IPK Groups**, **IPK Thresholds**, **Workflow Thresholds**, or **Send Email**.

To identify recipients for SLM notifications, take the following steps:

1. Select the event for which you want to specify a recipient.
2. In the **Recipients** dialog box, use the search options to define the search criteria. For example, to display Analysts belonging to a specific Organization, select the **People** radio button and specify the organization in the **Organization** field.
3. Select **Find**.
4. In the **Results** table, select the recipient(s) you want notified, using the **Ctrl** or **Shift** keys to select more than one.
5. Select **Add** to add the recipient(s) to the **Selected Recipients** table.
6. Select the **Email** and/or **Pager** tick boxes next to the recipient(s) name(s) to indicate the method of notification.
7. Select **Ok** to save the details and return to the IPK Groups window.
8. Repeat for each SLM event for which you want to identify notification recipients.
9. You can remove recipients from the Selected Recipients table by selecting .

## Viewing IPK Groups

1. Select the Menu button , then **Admin**, and then select **System Administration**. The System Administration window is displayed, with a menu of options available. In the Explorer pane, expand **Security**.
2. Select the **IPK Groups** option from the Explorer pane. The IPK Groups window appears, listing the existing IPK groups in a browse table.

{% hint style="info" %}
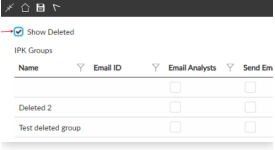
To see deleted groups, tick the "Show Deleted" checkbox (*Available in 10.6.8.14701 and later releases.*)
{% endhint %}

## Updating an IPK Group

You can update the details held on an IPK group to reflect changes to the company. When a group is updated, all Analysts linked to this group will remain linked to the new group; that is, only the group name or settings are changed.

1. Display the IPK Groups window if it is not already on screen.

   Select the Menu button , then **Admin**, and then select **System Administration**. The System Administration window is displayed, with a menu of options available. In the Explorer pane, expand **Security**.

   Select the **IPK Groups** option from the Explorer pane. The IPK Groups window appears, listing the existing IPK groups.
2. Update the details as necessary.
3. Select to save the changes. Provide the Change Reasons if prompted to do so.

## Deleting an IPK Group

If you no longer need an IPK group, you can delete it.

{% hint style="info" %}
**Before you Start**

Before deleting the group, all linked entities, such as person records, calls, security roles, should be updated to a new group.
{% endhint %}

{% hint style="warning" %}
**Up to version 10.6.8.14627**, You cannot restore deleted IPK groups, you must create them again.&#x20;

Entities linked to the deleted group will remain linked until a new group is selected, and will display the deleted group with an **asterisk** beside the name to indicate it is a deleted value.
{% endhint %}

{% hint style="danger" %}
You cannot delete the default IPK group. You will receive an error message if you attempt to do so.
{% endhint %}

1. Display the IPK Groups window if it is not already on screen.
2. Select the Menu button, then **Admin**, and then select **System Administration**. The System Administration window is displayed, with a menu of options available.&#x20;
3. In the Explorer pane, expand **Security**.
4. Select the **IPK Groups** option from the Explorer pane. The IPK Groups window appears, listing the existing IPK groups.
5. Select the group you want to delete.
6. Select the Delete icon. The group disappears from the browse table. However, it is not deleted from the database until you save the changes.

   **If it is the default group for any analysts, you will receive a warning message asking if you wish to continue.**
7. Select to save the changes. Provide the Change Reasons if prompted to do so.

## Restoring a Deleted IPK Group

Applies to: ASM HERMES 10.6.8.14627 (*AS4415)*

If you wish to restore a deleted Group, you will need to display the deleted group(s) using the check box and then select to restore the Group.

1. From the Group Search Results, Select to "**Show Deleted**"

<figure><img src="/files/jUFfpej4m5v63o9UIWGy" alt=""><figcaption></figcaption></figure>

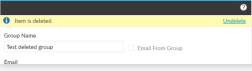
2. Open the group you wish to restore, and then select to **"Undelete"** the group.

<figure><img src="/files/7ZZZNwpyZYkhGirtdKkT" alt=""><figcaption></figcaption></figure>


---

# Agent Instructions: Querying This Documentation

If you need additional information that is not directly available in this page, you can query the documentation dynamically by asking a question.

Perform an HTTP GET request on the current page URL with the `ask` query parameter:

```
GET https://docs.alemba.com/asm-hermes/setup-and-configure-asm/configuring-your-system/system-administration-settings/security/ipk-groups.md?ask=<question>
```

The question should be specific, self-contained, and written in natural language.
The response will contain a direct answer to the question and relevant excerpts and sources from the documentation.

Use this mechanism when the answer is not explicitly present in the current page, you need clarification or additional context, or you want to retrieve related documentation sections.