Using Rules
You can specify conditional rules for how fields behave. Your screens can display different fields, or make them mandatory or optional depending on dynamically changing conditions you specify.
You can learn more about using dynamic logic in this video tutorial. (Please note: this video tutorial is from an older version of ASM, vFire, but is still relevant)
Configure a Rule

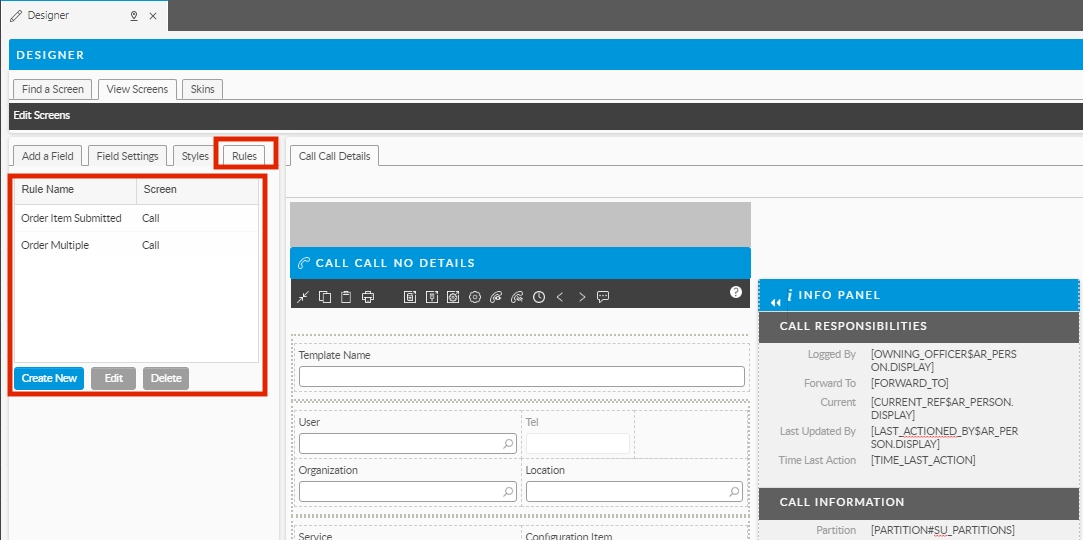
Select the Rules tab.
Double click on an existing rule if you wish to update it, or select Create New to create a new rule.
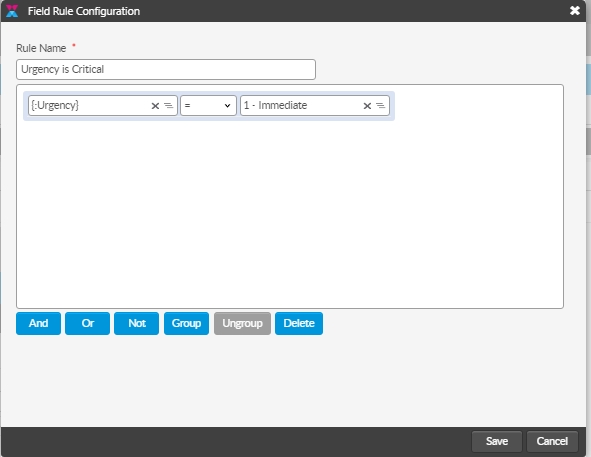
The Field Rule Configuration window appears.
Provide a name for the rule if you are creating a new rule.
IMPORTANT NOTE WHEN NAMING YOUR RULES
When creating rules and fields in ASM Designer, it's crucial to avoid using certain special characters in the name such as:
Period (.) Used to delineate object names (tables) and can lead to parsing errors
Comma (,). Used by SQL when parsing and can cause unexpected behavior
Percent Sign/Symbol (%) Used in LIKE clauses for pattern matching
Dollar Sign/Symbol ($). Used in SQL to denote an internal system catalog view
At Sign/Symbol (@) the @ symbol is used to declare a variable
Double quotes (") Used for string literals
Single Quotes (') Used for object identifiers
Forward Slash and Back Slash (/ and \ ) Arithmetic operators and escape characters.
Semicolon (;): Used to separate statements.
Square brackets ([ ]): Used in LIKE clauses for pattern matching.
Asterisk (*): Used in SELECT statements to select all columns.
Double-Hyphen (--): Used for comments when doubled (--), and can be misinterpreted.
Plus (+), minus (-): Arithmetic operators.
These characters are reserved and have special significance in SQL, the language used for managing and manipulating databases. If these characters are included in a field name, particularly at the start. They are automatically added to the database name as-is. Their use can lead to potential issues or errors in SQL operations because these characters might be interpreted in a way that was not intended, affecting the execution of SQL commands. A common observation, for example, is that rules with a comma in the rule name are often "invisible" and inaccessible through the UI.
To ensure smooth operation and to avoid database errors, it's recommended to refrain from using these characters in names. A better option is to use the Underscore (_).
Select the Boolean Rules Builder editing box.
Scroll to view a list of all possible values from a multi-tiered list, and choose the field for which you want to create a rule.
In the next field, select an operator. The operators you can pick depend on the item you selected. You can pick from standard boolean values: =, <>, <=, contains, starts with, ends with, and so on.
Select the value or criteria for the field from the drop-down list in the next field.


Add further criteria by selecting the And, Or or Not buttons and repeat step 4.
Group your criteria if necessary using the Group button. This will insert parentheses around the selected part of a statement.
When you are done select Save.

About Grouping Criteria and the Order of Operations
Order of Operations

Those criteria contained within the parentheses (Grouped) are evaluated first and the result then processed as part of the entire statement with NOT having the highest priority, followed by AND, and then OR.
For example, if we wanted to compose a rule that evaluated true when 2 conditions are true: 1. the call logged was not critical and 2. it did not come from either the BAU Support or the Cloud Support pipelines, we will have to group the statement to get it to evaluate in the correct order.
EXAMPLE:
NOT ({:Call Priority} = "1 Critical"
AND NOT ({:Call Source} = "BAU Support"
OR {:Call Source} = "Cloud Event"))
We can see here that there is a group inside of a group. *All criteria in parentheses are evaluated first and within that, the order of operations begins with the NOT statements.
Let's break it down:
NOT({:Call Priority}= "1 Critical"
In this case, the first thing evaluated is the first grouping "Call Priority is not equal to critical"
AND NOT
Next the AND is evaluated according to the order of operations, and because the statements that follow are also grouped, they will be evaluated on the whole.
({:Call Source}= "BAU Support"OR{:Call Source}= "Cloud Event"))
Because this line is preceded by "AND NOT", we are evaluating for everything not equal to BAU Support OR Cloud Event.
The final result is that this rule is looking at non-critical tickets where the call source is not BAU Support or Cloud Events.
To Group Criteria
Select the content to group using your keyboard or mouse
Click "Group"
Apply a Rule to a Field or Section
Apply the rule to the relevant field by selecting the field. The Field Settings tab is automatically displayed.
In the Field Settings, use the drop-down lists to select where to apply the rule. Different field types display the option to apply a rule in slightly different ways.


Scroll to the bottom of the screen if necessary and select Save to save the changes.
FAQ
Can I apply many rules to a single screen element?
No just one. If you want to apply two rules, just create a third rule that contains both of the others.
Are rules available on other screens?
Yes - you can see rules from parent screens.
If I clone a screen with rules, are the original rules available on the new screen?
Yes
Does this affect the behavior of the Unique field property?
No – that continues to work as before.
Last updated
Was this helpful?