Configuring Fields
You can configure fields in any of the following ways:
Edit the field properties and options
Apply filters to lookup fields to ensure the users only sees the data intended
Apply a security level so that only Analysts and Users with the appropriate security access can view or edit the field
Apply a mask that ensures that only a certain type of information can be keyed into a field
In most cases, changes to these properties only apply to the selected screen. Fields that are on related records, such as a user’s telephone number on a Call screen, are Read Only by definition, so you cannot apply a condition or make them required. You can however make them conditionally Hidden.
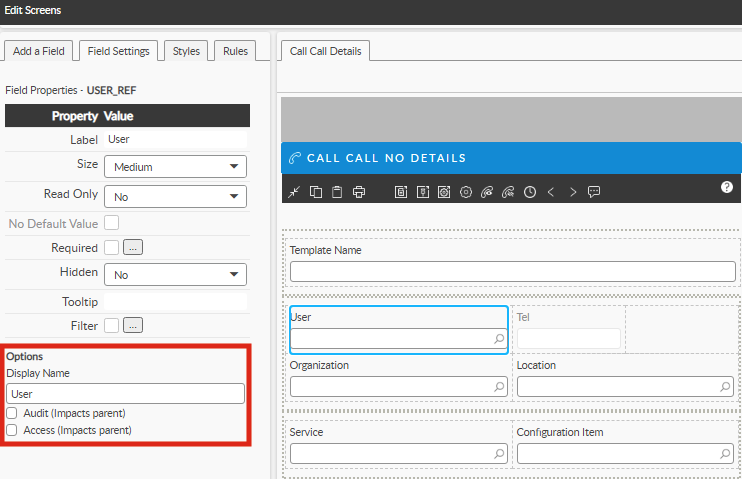
The Display Name and Label for a given field are 2 different things (See image below): The Display Name is the global display name (in pick lists, rules builders, etc.) whereas the Field Label applies only to the current screen. Alemba do not advise changing the Display Name of a field. This is because other projects may have used the same field on other screens and in other processes. Changing the display name would cause confusion. Think of it as the System Default Name whereas the Label can and should be configured to appear the way you want it to appear on the screen itself.
Some changes to system fields are reflected globally and changes you make in one screen will impact other screens. For example, if you place access restrictions or auditing on specific global system fields, that change will impact the field and its behavior on all screens in ASM. Any field where you see the following (Impacts Parent) will behave in this way (See image below).
These fields are:
User
Organization
Location
Service
Configuration Item
Type
Ref
Impact
Urgency
Priority
Description
Actions and Solutions
Setting Field Properties
Before you start
Before making amendments to the configuration of fields, we strongly recommend that you undertake appropriate training on ASM Designer.
Exercise caution when using ASM Designer to modify designs which have been customized by Alemba® Professional Services. Contact your Alemba® account manager if you are uncertain about whether your actions will impact these customizations.
To configure fields using ASM Designer, you must have Designer selected in your General Access Security Role.
To maintain an audit trail of changes made to screens, forms and message templates, Designer must be selected in the Auditing window.
Select the field(s) you want to work with. Small squares will appear in the corners and top and bottom edges of the selected field(s) as in the image above, a blue box will surround the selected field.
The Field Settings tab is automatically displayed, and the field settings that you can edit for the selected field(s) on this screen are shown in the Field Properties table in the left pane.
Any of the following may be displayed, depending on your field selection, for you to update as appropriate:
Label
The screen label for the field, button or section (except sections without headings). The default value is the Display Name.
The field label is only used on the screen you are editing, so the same field can have different labels on different screens.
It is not used in searches (search criteria). Display name must be used for this purpose.
Field labels, particularly those which appear on the Self Service Portal, should be managed with care and attention to detail. Use plain language and user-friendly and familiar terms where possible. You can include any amount of text needed to explain the field where appropriate.
Size
A pre-defined physical size for the field. Options include:
Small (1/4 the window width)
Medium (1/2 the window width)
Large (3/4 the window width)
X Large (full with of window)
ASM Designer supports relative positioning, so depending on the size of the field and adjacent fields, some fields may be automatically moved or resized to fit all fields within the width of the window.
Read Only
Use the drop down list to select whether the field is read only, that is, Analysts and Users will be able to see the field value, but cannot change it.
If Yes is selected, the Required property is disabled.
A list of available rules appears. If a rule is selected the field is read only while the condition in the rule is met.
If the field appears on a portal review screen, this property is hidden by default.
Required
Select the checkbox to make the field mandatory. Select the button to display the Required Field Configuration window , in which you can specify conditions, rules and available actions.
This property is not available for editing fields on portal review screens or message templates. It is also unavailable if Read Only has been selected.
You can link a rule to one or more Action, so that when you perform that action, the rule is applied. For example, you can leave some fields optional until you forward the call, at which point the system will check the rule, and if the condition is true, it will ensure that those fields are filled in first.
This additional feature is available for the following Actions:
You can also make fields Required for Actions without setting a rule, in which case the fields will always become mandatory when that action is invoked.
Hidden
Select whether the field, button, or section is to be hidden. Open the dropdown to select Yes or No or an available rule. If a button is hidden, the corresponding option is also hidden in the explorer. If a rule is selected, the field or button is hidden if the condition in the rule is met.
If a section and the fields contained in the section use this setting in a way that conflicts, the most restrictive setting is used, that is, if the section is hidden, the fields are automatically hidden, regardless of the setting selected for the individual fields.
No Default Value
No default value is provided/required. This field is disabled unless Required is checked.
Edit Mask
This only applies to text fields, and defines the input mask for the field.
Select the button to define an input mask for the field.
Unique
This is only available for text fields. It ensures that the value entered in the field is not the same as a value entered in another specified field in the database.
Ensure that the Unique box is ticked, and then select to display the Unique Condition window.
In the Data Field for box, use the button to search for the screen set you want to use.
Complete the other configuration options if you wish:
Disabled
This setting applies to tabs in Tabbed Sections only.
Select to disable the tab, preventing people from selecting it.
Expanded by default
This is only available for collapsible sections.
If selected, the section is expanded by default when the screen opens. If this field is left empty, the section is collapsed by default
Date Display
This is only available for Date fields. ASM displays the format according to the local machine browser settings.
Specify if you want a date field to display a date-only field or as a date and time field.
Allow Decimals
This is only available for numeric fields.
Select to allow the use of decimal numbers.
Allow Negatives
This is only available for numeric fields.
Select to allow the use of negative numbers.
Assigned List
This property only applies to Multi-Select, Drop Down, and List Box fields.
Select Edit to modify the name and values of the list assigned to the field. You can only edit lists defined for custom fields. Only the system administrator can edit the values in a standard list.
Tooltip
Tooltip text for the field. For HTML editor fields, the tooltip is visible when hovering over the Full View hyperlink.
Filter
If checked, a filter is applied to searches performed from this field. Select the button to define the filter for the field. See Rules Builder to learn how to define conditions for the filter. Filters are specific to the selected field on the selected screen, meaning that setting a filter on a Person field in one screen will not apply that filter to Person fields on all screens.
Ensure that you have selected the checkbox.
Searches in this field are limited by the conditions defined in the filter as well as permissions defined in the Self Service Portal role of the user.
Field Options Section
Field properties which will update values across all screens where the selected field is inserted appear below the heading Options. Complete as required:
Display Name
The name for the field. This appears wherever the field is referenced in the system, such as in search criteria, and when adding the field to a screen in ASM Designer.
To specify a new name, simply overwrite the existing one.
Audit
Select to enable auditing of the changes made to this field. Changes can be seen under the Audit option in the explorer of the corresponding screen.
If the field is a standard data field or an extensible field inherited from another screen, this option will be labeled Audit (Impacts Parent). Otherwise, if the field is particular to the current screen, it will be labeled Audit.
You cannot redefine audit properties for inherited (child) fields.
Access
This option is not required for certain field types.
Select the security access level for the field.
If the field is a standard data field or an extensible field inherited from another screen, this option will be labeled Access (Impacts Parent). If it is particular to the current screen, it will be labeled Access.
You can apply the following access levels:
None (no visibility). Analysts viewing the screen with this field will not see the field at all.
Read only. Analysts with the selected security profile will be able to view the field but not complete it.
Full (edit rights). Analysts with the selected security profile can view and edit this field on any editable screen.
See Applying a Security Level to a Field for more details.
Select Save at the bottom of the window to save changes to the current screen.
Save All saves changes to all open screens. If auditing is turned on, the Change Reasons window will display, prompting you to add a change reason.
Useful Tips for Designing your ASM Self Service Portal Field Labels
When you are configuring fields that are visible in ASM Self Service Portal, you need to consider certain design aspects so that your fields, buttons and widgets remain properly aligned and have full visibility. You also need to be aware of certain cascading design features, so that if you change a label in one screen, it will override a field label in certain others, as described below.
Service Action and Service Bundle Screens
You should be aware that if you make the text too long, it will wrap around, misaligning columns in adjacent widgets.
To prevent misalignment of the fields, the maximum of characters for the Qty field label should not exceed 15, and for the Order button should not exceed 25.
The order for displaying the Order/Submit button is as follows:
If there is a label value in the individual Service Action or Service Bundle record in ASM Core, it is used.
If not, the label value in the CMDB Item Type window is used.
If this does not contain a value either, the value set in ASM Designer for the Service Action/Service Bundle Review Screens and Global Label for the Tile are used.
It is not possible to display a value set in ASM Designer on the Tiles.
Using Masks
You can create an input mask for a text field that can be validated when a value is entered into that field.
If an input field must have numeric data (such as a telephone number) you can apply a mask so that the field will only accept numeric data.
Masks can only be applied to text fields. Changing the mask of a field on a screen does not affect other screens in which the field is used. This means that a field can have a different mask applied to it in each screen in which it is used.
Applying a mask to a field
Select the field for which you want to create an input mask.
The Field Settings tab is automatically displayed. In the Field Properties, select the Edit Mask property. If this is not visible, you cannot apply a mask to the field.
In the Masks window, select the mask you want to apply from the list of existing masks if available. If you cannot see the mask you want, you can create a new mask.
Select OK.
Creating a mask
You can create a new mask, or copy an existing one. To create a new mask, take the following steps:
In the Masks window, select Add.
In the Mask Details window,complete the details:
Mask Warning
The message to be displayed if the input does not meet the mask rules
Value
Specify the mask string, using the following:
3. Type an input string into the Test Input field. As you type, the results of the test display next to the Test button. If the mask input you entered is valid, it displays ‘Valid Input’, otherwise, you will see the message ‘Invalid Input’.
4. When you have verified your mask is correct, select OK to save the new mask. It appears on the list of existing masks, and can now be selected.
Copying a mask
You cannot copy, edit, or delete the system-defined mask, ‘None’.
In the Masks window, select the mask you want to copy in order to create a new mask.
Select Copy.
In the Mask Details window, update the details as needed, test and save it.
Editing a mask
You cannot copy, edit, or delete the system-defined mask, ‘None’.
In the Masks window, at Existing Masks, select the mask you want to copy in order to create a new mask.
Select Edit.
In the Mask Details window, update the details as needed, test and save it.
Deleting a mask
You cannot copy, edit, or delete the system-defined mask, ‘None’.
In the Masks window, select the mask you want to delete.
Select Delete.
Select OK.
Applying a Security Level to a Field
The system administrator defines the Security Levels for your system, and assigns appropriate ones through the Person Details record.
You can use ASM Designer to assign an access level to a field for each security profile to which you have access. By linking security profiles to a screen, analysts will only be able to interact with the field (on any screen on which the field appears) if their security profile is mapped to the appropriate access level.
If an analyst has been assigned different security profiles, and these have been assigned different access levels in the field settings, the lowest level of security will apply.
For Example: If an analyst is assigned the Change Manager and HR Manager security profiles, and the security on a field is set as: Change Manager = Full, HR Manager = Read Only, the analyst will have Full access to the field.
You can apply security to standard fields, custom fields and non data fields (such as Sections and Headings).
When you create a new custom screen from a parent screen, the security applied to the fields on the parent screen is inherited by the custom screen. However, you can alter these.
Before you start
To reposition layout elements on a screen using ASM Designer, you must have Designer selected in your General Access Security Role.
To maintain an audit trail of changes made to screens, forms and message templates, Designer must be selected in the Auditing window.
When copying a screen from another screen set, you will only be able to set the security level on the new screen for the security profiles to which you have access, regardless of the partition assigned to either the copied or the new screen.
You cannot apply security levels to fields on a portal review screen. Nor can you redefine access properties for inherited (child) extension fields.
Select the field(s) to which you wish to apply a security setting. If you set security on a section, this applies the same security settings to all fields in the section, and overwrites any individual security settings applied to the fields in the section.
The Field Settings tab is automatically displayed. Select the Access checkbox in the Options list below the Field Properties table.
If the field is a standard data field or an extensible field inherited from another screen, this option will be labeled Access (Impacts Parent). Clearing or selecting the Access (Impacts parent) option affects all screens on which the field is inserted for the current screen set.
A drop-down list of options appears. For each security profile to which you have access, select the entry in the Access column to select an access level.By default Users have the Unspecified security profile.
Nonehides the field for the selected security profile. Analysts viewing a screen with this field will therefore not see the field at all.Full
enables Analysts to complete the field (this is the default setting)
Fields added to portal review screens are read only by default (since these screens are for reviewing information only, unlike submission screens which are used to submit information).Therefore, even if the field is set to Full, if it appears on a portal review screen, it is still only read-only.
Read-Only
enables analysts to view the field but not complete it
Select Save at the bottom of the window to save changes to the current screen. Save All saves changes to all open screens. If auditing is turned on, the Change Reasons window will display, prompting you to add a change reason.