Chat Bot
ASM Self Service has a virtual analyst/chatbot capability that allows customers to interact with the bot before deciding the next course of action.
i.e. Did the bot resolve their issue or do they need to seek further advice from an analyst through a chat session or direct through a ticket form? Any transcripts through the bot or through analyst chat sessions are fully written to incident records.
In order to set up the Chat Bot Service, first you will need to connect to the Microsoft Azure Portal and then publish the Knowledge Base.
You’re going to see 2 parts for the configuration process: ASM Configuration and Azure Language Studio Configuration.
Part 1 - Setup Azure
Step 1 - Connect to the Azure Portal
Using the Azure Portal, create a new Language Service resource and a Search Service Resource
When creating the new Language resource, from the Custom feature list, select the Custom question answering.
Add details related to your Azure Tenant subscription, resource group, resource name, location and pricing tier.
Create the TextAnalystics by selecting the Project Details, the Instance details and the pricing tier.
Step 2 - Create a Search Service Resource
You will need to follow the same steps when creating the Search Service Resource by selecting the Subscription, the Resource group and completing the Instance details like the Service Name, Location and Pricing tier.
Using the Azure Portal, log in to Language Studio and select the configured Language Service and Azure search resource.
Step 3 - Create a new custom question answering project
Step 4 - Choose language settings for the project
Enter the basic information for your custom question answering knowledge base such as name and description, default answer when no answer is returned:
Step 5 - Add a Chit Chat Source
Go to Manage sources and add a Chitchat source or any other files from the list:
Step 6 - Deploy the knowledge base
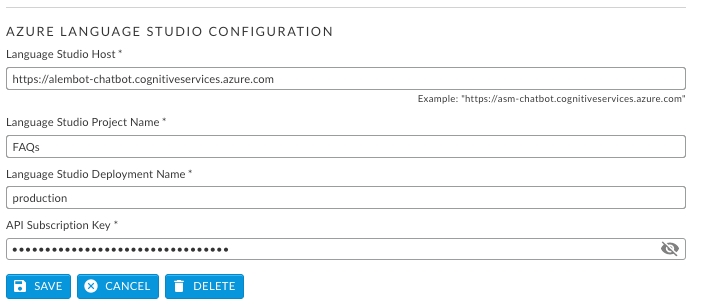
After the knowledge base has been deployed, gather connection information for integration with ASM. Click on Get prediction URL and get the following values that will need to be added to ASM:
Host URL
Ocp-Apim-Subscription-Key
Project Name
Deployment name
Part 2 - Setup and Configure ASM ChatBot
Step 1 - Enable ChatBot
Enable Chatbots in ASM via the Preview Features section in System Administration so that Chatbot settings will appear in the Admin Explorer Menu
See also:
Step 2 - Configure ChatBot
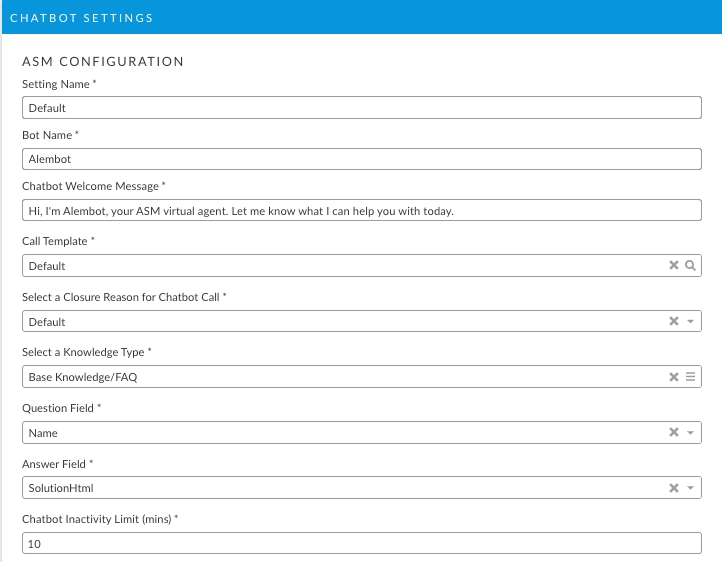
For the ASM configuration, start by customizing:
The Setting Name
The Bot Name
The Welcome Message
Choose options from the list for the Call template, Closure reason for the chatbot call, Question and Answer fields (where the question/answer is stored on the Knowledge Article)
Also, make sure to configure the Chatbot Inactivity limit: if the chatbot session will be inactive for a X amount of time (min), it will close the session and will submit a Call linked to that session and it will also append the chat history to that Call with this information.

Step 3 - Connect ASM to Azure Language Studio
Connect ASM to the Azure Language Studio Service by filling the fields on the Chatbot Settings page. This will create an outbound connection from the ASM server to Azure Language Studio on standard HTTPS port 443.
All fields are required.

Click Save.
ASM will be connected to Language Studio after are the fields are filled and the configuration is saved in ASM. Once saved you can then export the knowledge articles to Language Studio by pressing the Export button.
Details regarding the export will be provided in a list below.
Review the list for any errors and take appropriate action when required. Once the errors are resolved, you can retry the export by clicking on the "Retry all failed” button.

Step 4 - Import Knowledge Articles
Knowledge articles are imported into Language Studio where they will get updated automatically from ASM. Once the connector is set up, changes and updates in knowledge in ASM will be pushed through Language Studio.
A “Chatbot Status Widget” has also be added to the knowledge info panel via the screen designer to track the synchronization status.
The knowledge synchronization can also be tracked via the knowledge article. An explorer option “Chatbot Sync” is present.
About Knowledge Article Updates
Knowledge articles are imported into Language Studio where they will get updated automatically from ASM. Once the connector is set up, changes and updates in knowledge in ASM will be pushed through Language Studio.
You can add Chat Bot Sync information to the information panel of your knowledge articles in Screen Designer:

The knowledge synchronization can also be tracked via the knowledge article.

Last updated
Was this helpful?
