Viewing Knowledge Entries
If you are searching for an answer to a question or problem, use the Knowledge Search window or the Quick Search to view the knowledge entry.
There are three ways in which you can view knowledge entries:
Via the Knowledge Search window
Via the Quick Search on the toolbar
Or via the Knowledge Admin Search window.
The first two methods open the Knowledge Entry window which is in 'reading' mode. The third method opens the Knowledge Entry Details window which is in edit mode.
Use the Knowledge Admin Search window if you need to update, moderate, or delete knowledge entries, or to find knowledge entries that are deleted or in draft. You will also find additional information about knowledge entries in the Information Panel, using this search.
Searching for Knowledge Entries
Before you start
If moderated is selected in the Knowledge Bank Settings, unmoderated knowledge entries will not be displayed.
You must have Search selected on the Options tab of your Knowledge Management security role.
Quick Search
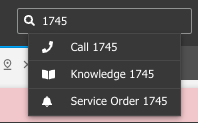
To the far right of the toolbar is the Quick Search box:

From the Quick Search menu, enter the knowledge article number and press Enter. A list of all entities in the system matching that number will appear. Select the Knowledge article you want to view.
Knowledge Search
Select ≡ > Search > Knowledge Bank.
The Knowledge Search window has two panes. The Search Criteria pane is on the left where you enter search options. The main pane on the right displays the results of a search.
Select your search criteria in the Knowledge Search Criteria pane on the left.
The Options section contains fields that allow you to search on the following criteria:
The available Article types will depend on what has been enabled in System Administration.

All
Select to search for all types of knowledge entries.
Abstract
Select to search for entries that have the type set to Abstract
Call
Select to search for entries that have the type set to Call.
Directory
Select to search for entries that are Directory type
FAQ
Select to search for entries that have the type set to FAQ.
KCS
Select to search for KCS knowledge entries.
Known Issue
Select to search for knowledge entries that are Known Issues.
Website
Select to search for knowledge entries that are websites.
Order By
Select an option from the list to specify how your search results will be displayed. The search results are sorted and displayed based on the option selected. You can order your search results by Search Score, Rating, Most Recent or Profile.
Include Deleted Field Values
Select to include deleted values in the search criteria fields, that is, to search for a knowledge entry based on a value that may have been deleted. For example, if an Analyst who created a knowledge entry was deleted from the system, selecting this option adds the Analyst’s name to the list of people you can select in the Created By search field.
The Knowledge Article Criteria section contains fields that allow you to search on the following criteria:
Created By
Start typing to search for the Analyst who created the knowledge entry and use this person as the criteria for your search
Search Text
Select this criterion to search for Knowledge Entries by typing in words or text the entry may contain.
When you perform a knowledge search from a call, the call description is copied into the Search Text field, although the Search Text field itself is not selected as a criterion by which to search. This is by design, since running a search with a large number of words in the Search Text field will take a long time and most likely return no results. As such, if you want to use the call description in the knowledge search, you should review the words listed and then select the Search Text field so that it is used.
Performing a Text Search
You can choose to search text in the call, (description text) or the attached objects.
The search returns knowledge entries with regular expressions associated with the search words, including wildcard characters such as an underscore (_) to represent one character or percentage (%) to represent zero or more characters.
Usage of regular expressions is specific to SQL Server. The regular expression wildcard characters that ASM Core supports include:
Wildcards in SQL Server Text Search
ASM used SQL server, exclusively. In SQL Server, wildcards are used in text search to allow for flexible pattern matching. The most commonly used wildcard is %, but SQL Server also supports several other wildcards. Here’s an overview of the wildcards supported in SQL Server for text searches:
% (Percent Sign) – Match Any Sequence of Characters
Represents zero or more characters in a search
This will match any first name that starts with “J” (e.g., John, James, Jason).
_ (Underscore) – Match a Single Character
Represents a single character in a search.
J_n
This will match any first name that starts with “J”, followed by any single character, and ends with “n” (e.g., Jon, Jen).
[] (Square Brackets) – Match Any Single Character within a Range or Set
Matches any single character within the brackets. You can also specify a range of characters.
[JM]on
This will match first names that start with “J” or “M” and end with “on” (e.g., Jon, Mon).
[A-D]
This will match any first names starting with “A”, “B”, “C”, or “D” (e.g., Alice, David).
[^] (Caret Inside Square Brackets) – Exclude Characters within a Range or Set
Matches any single character not within the brackets. Used to negate a character set.
[^J]%
This will match any first name that does not start with “J” (e.g., Alice, Monica).
- (Hyphen) – Match a Range of Characters within Square Brackets
Defines a range of characters when used inside square brackets ([]). This can be combined with the [] wildcard.
[A-F]%
This will match first names that start with any letter from “A” to “F” (e.g., Alex, Frank).
[0-9]%
This will match any last name that starts with a number (e.g., 1st, 2nd).
Adding Additional Search Criteria
You can add more fields to your search criteria. To do so, select at the top of the Knowledge Search Criteria pane and configure your search criteria.
Select Search. The results are displayed in a browse table in the right hand pane, with the score (shown as a percentage) on the far right indicating how closely the entry matches the criteria. Each entry type is denoted by a specific icon.
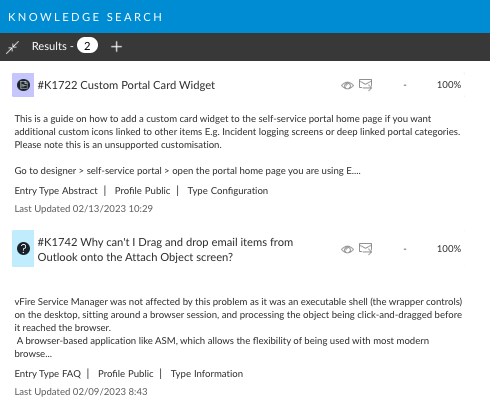
You may see entries that do not appear to contain any of the search keywords entered. This is because each knowledge entry has Context, which is the collection of all calls linked to it. The description of each call in the context is indexed along with the text in the knowledge entry. This enables Analysts to find entries that may be relevant to a call by searching for words featured in the description of other calls that these entries have previously helped solve.
Select the entry you want to view.
Other Search Options
You can add additional search options by selecting at the top of the Knowledge Search Criteria pane and configuring your search criteria. A description of some of the options (that is, attributes of knowledge entries) you can add is provided below.
Knowledge Ref
Select to search for a knowledge entry by its Reference Number.
Call No
Select to search for all entries linked to the specified call number.
External Ref
Select to return all entries that have this external reference number in the search results.
Entry Type
Select to return knowledge entries with a selected Entry Type. Select the required entry from the list.
Profile
Select this option to return knowledge entries with a specified Knowledge Profile. Select Equal to search for knowledge entries where the entry’s profile is the same as the profile selected. Select Equal + Below to search for Knowledge Entries within the Profile you have specified as well as knowledge entries within the lower tiers for the profile.
CMDB Item
Select to return knowledge entries related to a specified CMDB item. Use the Q/D button to locate the CMDB item for which you want to base your search.
Call Type
Select to return knowledge entries related to a specific issue type. Select Equal to search for Knowledge Entries where the entry’s type is the same as the type selected. Select Equal + Below to include lower tiers for the selected type in your search.
Entry Status
Select to return knowledge entries based on the selected status. Select a status from the Status list.
Contributor
Select to return knowledge entries based on the Analyst who is a contributor to those entries. Use the Q/D button to locate the contributor.
Last Updated
Select to return knowledge entries based on a specified Last Updated date.
Knowledge Entry Window
The knowledge entry window displays information about the question or issue you were searching for, and may also include links to relevant calls, websites, or other knowledge entries, and linked objects including CMDB Items.
Info Panel - reading mode
This contains the following information.
Entry Type
One of the seven Knowledge Base types
Knowledge Ref
The unique reference number of the knowledge entry
Status
The status of the knowledge entry
Profile
The tiered knowledge profile
Type
The issue type linked to the knowledge entry
Service Desk Hits
The number of times the entry has been viewed by analysts
Portal Hits
The number of times the entry has been viewed by users
Feedback Responses
The number of people who have rated the entry for its quality and content
Feedback Rating
The overall rating of the entry in terms of quality and content
Toolbar Buttons on the Knowledge Entry Window
A number of toolbar buttons are provided on this window, which enable you to print the entry, link it, etc.
Feedback on a Knowledge Entry
You can give feedback on an entry, including rating for quality and content, flags for the entry to be reviewed and commented on. Any submitted feedback can be viewed via the Feedback Explorer Option on the Knowledge Bank window.
Scroll across/down to see the feedback area.
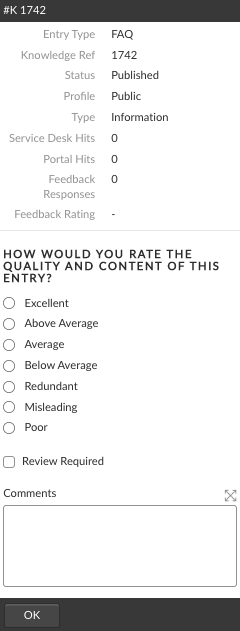
In response to the question How would you rate the quality and content of this entry?, select one of the available ratings.
Select the Review Required checkbox if you would like the entry to be reviewed. Entries flagged for review are still be available for viewing and editing by analysts with appropriate permissions.
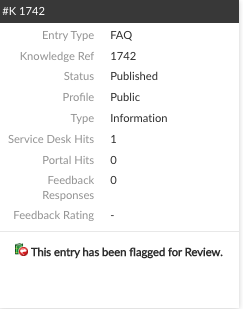
Once an entry has been flagged as requiring review, the Review Required checkbox will no longer be displayed.
Use the Comments box to provide more information on the feedback rating you have selected or the reason for selecting the Review Required option.
Select OK to save the feedback. The information panel is updated with the feedback information. If you have requested a review, a flagged for review message appears at the bottom of the pane.
Last updated