Styling the Self Service Portal
You can create multiple Skins for your Self Service Portal to display the logo, colors, fonts, and other distinctive brand features of your organization or various departments.
Skins in the Self Service Portal
You can style your portal natively, without having to manipulate HTML or CSS:
Create multiple skins, so that you can display different systems differently
Create and configure Self Service Portal submit and review screens
Rebrand the Self Service Portal template page (banner, menu bar, navigation bar, headings, text format)
Change the font, color, and style of screen widgets, buttons, and the menu panel
Menu items in the My Options menu pane can be hidden, added to, and reordered in Self Service Portal My Options in System Admin.
Creating/Cloning a Skin
Two skins are provided with ASM Core: Default and Classic. Additional skins can be created. All skins can have their fonts, colors, banners, and widget styles redesigned.
Before you start
To work with Self Service portal skins using ASM Designer, you must have Designer selected in your General Access Security Role.
To maintain an audit trail of changes made to screens, forms and message templates, Designer must be selected in the Auditing window.
Display the ASM Designer window if it is not already visible on screen.
Select ≡ > Admin > Designer.
This window consists of three tabs that display different views:
Find a ScreenCan be used to search for and work with specific screens, forms or message templates, as well as create new in-house screensView screens
Displays details of currently selected screens and is used to modify screens
Skins
Enables you to create and modify skins for your Self Service Portal(s)
On the Skins tab, select the skin you want to clone from using the Skin drop down list in the top right corner of the window.
Select Clone at the bottom of the main pane.
Enter a name for your new skin and select Ok.
The new skin appears in the drop down list in the top right hand corner of the window and is ready to be redesigned.
To rename the skin select Rename at the bottom of the main pane, enter the new name and select Ok.
To delete the skin select Delete at the bottom of the main pane, enter the new name and select Ok.
If your system has multiple portal systems, you can apply a different skin to each one in Self Service Portal Systems in System Admin.
Redesigning a Skin
Display the ASM Designer window if it is not already visible on screen.
Select ≡ > Admin > Designer.
On the Skins tab, ensure that you are working on the correct skin by selecting from the drop down list in the top right corner of the window.
In the main part of the window, the Self Service Portal Template tab is selected, and displays a preview of the skin and all of its elements.
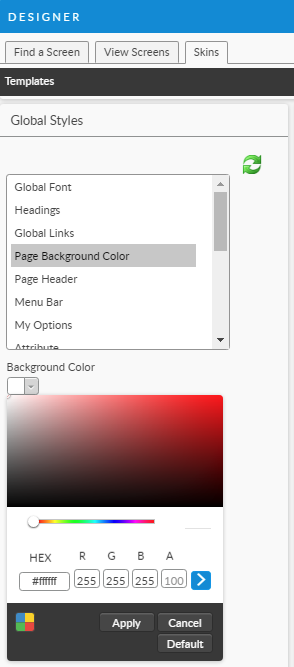
Select the element you want to modify, such as Global Font, Headings, Page Header, My Options, Widgets, and so on.
Beneath the list of elements, you can see a list of styles you may edit for the selected element. For example:
for Global Font, you can edit the Font Family, Font Color and Font Size
for Page Header, you can edit the banner image, banner background, image alignment, and so on
for All Widgets, you can edit Header Font family, color, size, and text spacing
for Table Widgets, you can edit alternate row striping, and border, header, font, background, and row color
Use caution when selecting the largest available font sizes. On small browser windows, the largest font sizes may result in text truncating, wrapping, or displaying poorly.
Select the new styles, using the drop down lists. To upload a new banner image, see the section below.
Select the Refresh button or Save to view the changes.
Select Save at the bottom of the main pane to apply the changes, or Restore Default to revert to the original skin design. Type the change reasons if prompted to do so.
Best Practice
When altering color schemes, capture the RGB values from your existing intranet sites so that you can match your colors exactly.
Uploading an Image for the Banner
By default, the Self Service Portal banner displays the ASM logo but you can replace this with your own logo.
Before you start
The image must be in a supported format. Designer supports JPEG, GIF, PNG, BMP and TIFF file formats.
Display the ASM Designer window if it is not already visible on screen.
Select ≡ > Admin > Designer.
This window consists of three tabs that display different views:
Find a ScreenCan be used to search for and work with specific screens, forms or message templates, as well as create new in-house screensView screens
Displays details of currently selected screens and is used to modify screens
Skins
Enables you to create and modify skins for your Self Service Portal(s)
On the Skins tab, ensure that you are working on the correct skin by selecting from the drop down list in the top right hand corner of the window.
In the main part of the window, the Self Service Portal Template tab is selected, and displays a preview of the skin and all of its elements.
Select Page Header in the list box and complete the details, selecting to preview the effect after each change:
Banner Minimum Height
Select the minimum height for the banner. If the image height and padding is larger than the selected value, the banner will automatically expand to accommodate.
Banner Image Padding
Select the number of pixels to add as padding for the image. The image is centered within the padding.
Show Main Image
Choose whether to show or hide the banner
Main Image Alignment
Choose whether you want the logo to appear on the left or right hand side of the banner
Banner Main Image
Select Browse and navigate to the image you want to use.
Select Open to see the name of the file in the field.
5. Select the Refresh button or Save to view the changes.
6. Select Save at the bottom of the main pane to apply the changes, or Restore Default to revert to the original portal template. Type the change reasons if prompted to do so.
If you want to rebrand the splash screen and default banner images that are not accessible through screen designer you can:
For Cloud Systems - Contact support and supply the following images: Footer Banner Image, Home Banner Image, and login poster image.
For On-Premise systems, replace the following files in the Root System Directory (C:\Program Files\Alemba\[ASM System] where [ASM System] is your ASM system Name. Note, older systems may be called vFire:
LiteFooterBanner.jpgLiteHomeBanner.jpglogin-poster.jpg
Best Practice
If you are in an on-premise system and decide to replace these files, always rename the original files as follows so that you can revert back if necessary:
LiteFooterBanner_Old.jpgLiteHomeBanner_Old.jpglogin-poster_Old.jpg
Displaying the Self Service Portal Template History
You can display the history of changes to the Self Service Portal template, which will record the dates of changes, the nature of the change, and the analyst who made the changes.
Display the ASM Designer window if it is not already visible on screen.
Select ≡ > Admin > Designer.
This window consists of three tabs that display different views:
Find a ScreenCan be used to search for and work with specific screens, forms or message templates, as well as create new in-house screensView screens
Displays details of currently selected screens and is used to modify screens
Skins
Enables you to create and modify skins for your Self Service Portal(s)
Select the Skins tab.
On the Self Service Portal Template tab, select the Self Service Portal Template History.
A list of changes appears, along with the name of the Analyst and the date of the changes. To see more detail, select the arrow to the left of the Analyst name.
If you wish to export the history to an Excel file for reporting or auditing purposes, select Export History at the bottom of the window and specify the file location in the Save As dialog box.