> For the complete documentation index, see [llms.txt](https://docs.alemba.com/asm-eos-10.5/llms.txt). Markdown versions of documentation pages are available by appending `.md` to page URLs; this page is available as [Markdown](https://docs.alemba.com/asm-eos-10.5/setup-and-configure-asm/designing-configuring-your-system/configuring-screens/dynamic-screens/using-rules.md).
# Using Rules
You can specify conditional rules for how fields behave so that your details screen displays different fields, or makes them, say, mandatory or options, depending on dynamically changing conditions.
You can learn more about using dynamic logic in the [video tutorial](https://vimeo.com/185615993/765f68a50d).
For demonstration purposes, we will create a rule in the call submissions screen in the Self Service Portal for if the urgency of the call is "Immediate". We can then use that rule to hide certain fields that may not be necessary when time is of the essence.
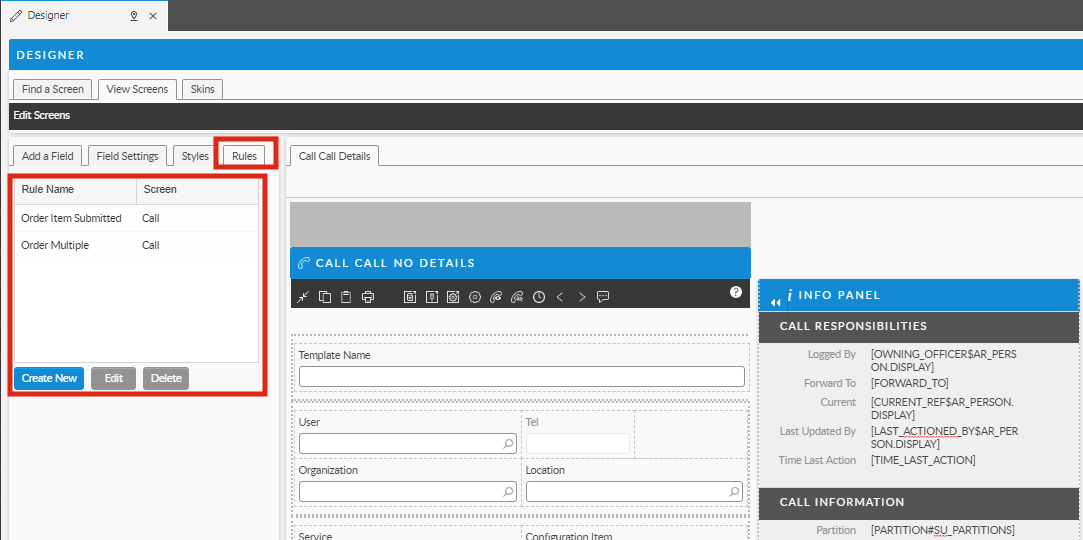
1. Select the **Rules** tab.
2. Double click on an existing rule if you wish to update it, or select **Create New** to create a new rule.
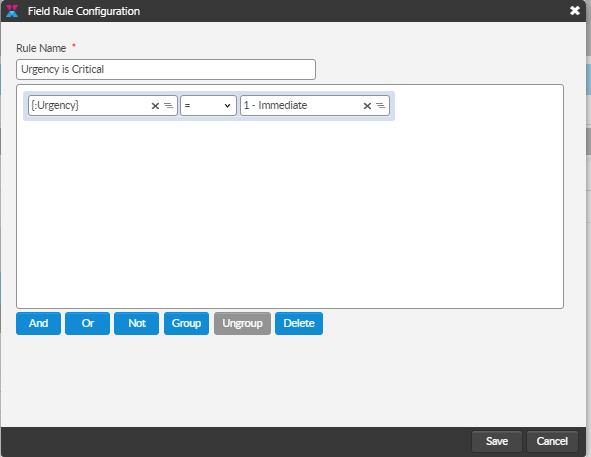
The **Field Rule Configuration** window appears.
3. Provide a name for the rule if you are creating a new rule.
4. Select the editing box.
5. Scroll to view a list of all possible values from a multi-tiered list, and choose the field for which you want to create a rule.
6. In the next field, select an operator. The operators you can pick depend on the item you selected. You can pick from standard boolean values: =, <>, <=, contains, starts with, ends with, and so on.
7. Select the value or criteria for the field from the drop-down list in the next field.
8. The items you can select are filtered to show relevant fields of the same data type as the selected field. ***If an item is not available for selection it is shown in italics allowing you to expand the next tier in a multi-tier list to choose an item from a lower tier.***
9. Add further criteria by selecting the **And**, **Or** or **Not** buttons.
10. Group your criteria if necessary using the **Group** button. This will insert parentheses around the selected part of a statement. Those criteria contained within the parentheses are evaluated first and the result then processed as part of the entire statement. Otherwise, **Not** statements will be evaluated before **And**, and **And** before **Or**.
11. When done select **OK**.
12. Apply the rule to the relevant field by selecting the field. The Field Settings tab is automatically displayed. In the Field Settings, use the drop-down lists to select where to apply the rule. Different field types display the option to apply a rule in slightly different ways.
13. Scroll to the bottom of the screen if necessary and select **Save** to save the changes.
### FAQ
**Can I apply many rules to a single screen element?**
No just one. If you want to apply two rules, just create a third rule that contains both of the others.
**Are rules available on other screens?**
Yes - you can see rules from parent screens.
**If I clone a screen with rules, are the original rules available on the new screen?**
Yes
**Does this affect the behavior of the Unique field property?**
No – that continues to work as before.