Viewing Outstanding Requests
Depending on your permissions, you can view your outstanding requests; your group's requests; escalated, suspended and delegated requests.
Last updated
Was this helpful?
Depending on your permissions, you can view your outstanding requests; your group's requests; escalated, suspended and delegated requests.
Last updated
Was this helpful?
The Requests Outstanding view shows the requests of which you are the owner or which have been forwarded to you or your group but for which you have not yet taken ownership. These requests include those in which you are working on at the current moment or will be working on in the future. Completed requests are not shown in this view.
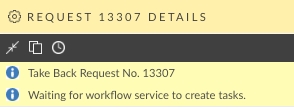
Beginning in ASM HERMES, you may see a message when attempting to view the workflow pallet immediately after submitting a new request that says "waiting for workflow service to create tasks". This is because a change was introduced to improve performance on the self service portal that removed the request pre-create.
In earlier version of vFire and ASM, ASM could pre-create as many as 3 to 7 requests and corresponding tasks and hold them in the database, in anticipation of the request being logged. This is no longer the case so the tasks are generated only upon request submission. Depending on the interval of the polling service you have configured on your application server, there could be a short wait from 90 seconds to 2 minutes.
Select ≡ and then View. From the submenu, select Requests Outstanding.
In the Requests Outstanding window, choose your filters:
Requests for Analyst
allows you to select the analysts whose requests you wish to view
You must have the View Others’ Requests or View Groups’ Requests selected in the Requests tab of your Workflow Management security role. You can only select from analysts whose requests you have access to. For example, if you belong to the Change Management group and analyst Sue belongs to both the Change Management and Workflow Management groups, you can only view Sue’s Change Management outstanding requests since you do not have access to requests in the Workflow Management group.
Workflow Process
Select the required workflow process from the drop down list
Requests Outstanding
This is the default view when you open the Requests Outstanding window.
You can filter this view.
Forward to You
displays the requests that have been forwarded to you but that you have not yet actioned
Forwarded to Your Group
displays the requests that have been forwarded to the group(s) to which you belong but that have not yet been actioned
Forward Internally
displays the requests that you have forwarded internally to an analyst or group but that you still have ownership of
Submitted
displays the requests that have been logged and submitted (including requests submitted through the Self Service Portal)
Not Submitted
displays the requests that have not yet been submitted
Authorized
displays the requests that have been authorized for implementation
Not Authorized
displays the requests that are pending authorization
To view all outstanding requests, select all filters.
Your Requests
displays all the requests that are currently assigned to you, unless you have forwarded them internally. Requests forwarded internally are only displayed if the Forward Internally filter option is selected
Forward to You
displays the requests that have been forwarded to you but that you have not yet actioned
Forwarded to Your Group
displays the requests that have been forwarded to the group(s) to which you belong but that have not yet been actioned
Forward Internally
displays the requests that you have forwarded internally to an analyst or group but that you still have ownership of
Submitted
displays the requests that have been logged and submitted (including requests submitted through the Self Service Portal)
Not Submitted
displays the requests that have not yet been submitted
Authorized
displays the requests that have been authorized for implementation
Not Authorized
displays the requests that are pending authorization
Your Group’s Requests
If members in the group do not have the permission to view outstanding requests, and requests are forwarded to the group, the group will not be able to view these requests on the Requests Outstanding window.
Select to display the requests assigned to your group(s) or forwarded by a member of your group(s) even if no analyst in the group has taken ownership of the request. If you are linked to more than one workflow group, select the group for which you want to see the requests from the Group drop-down list. To view the requests assigned to all of the groups to which you belong, select All Your Groups from the Group field
In this view, you can also view requests for which you are the manager, regardless of the group they are currently assigned to.
It is possible to forward requests to a group where analysts in that group do not have access to the Requests Outstanding window (that is, the Manager permission is not selected for their Workflow Management security role). In such cases, members of the group will not see the forwarded requests on the Requests Outstanding window and thus will not be able to action the request.
You can filter the group requests.
Current Group’s Requests
displays the requests assigned to the group selected in the Group drop-down list or owned by the members of the selected group.
This excludes requests that have been forwarded internally by a group member.
Forward To Group
displays the requests that have been forwarded to the group selected in the Group drop-down list or members in the group, but for which no action has yet been taken. If you are a Request Manager, you will see all the requests for which you are the manager, regardless of the group selected.
Forward Internally
displays the requests that have been forwarded by a member of the selected group to another analyst or group, but for which action has not yet been taken by the recipient analyst or group
Select one or more filters, as required.
Current Group’s Requests
displays the requests assigned to the group selected in the Group drop-down list or owned by the members of the selected group.
This excludes requests that have been forwarded internally by a group member.
Forward To Group
displays the requests that have been forwarded to the group selected in the Group drop-down list or members in the group, but for which no action has yet been taken. If you are a Request Manager, you will see all the requests for which you are the manager, regardless of the group selected.
Forward Internally
displays the requests that have been forwarded by a member of the selected group to another analyst or group, but for which action has not yet been taken by the recipient analyst or group
Filter
to create filters in order to reduce the number of requests in an analyst’s Requests Outstanding window. Filters effectively function as a set of personal folders into which an analyst can organize requests into meaningful groups
Escalated Requests
to view all requests brought to your attention because they have exceeded your organization’s service goals. You can choose to show only certain types of escalations by using the options in the left frame.
Requests in the Escalated Requests view are those for which you have been set as one of the escalation recipients, and not requests that you have failed to respond to or resolve.
The Escalated Requests view includes the following filtering options:
(This is the Drop-down text)
Resolution
displays the requests for which a resolve escalation alert has been activated
Action Breach
displays the requests which have not been actioned by the proper group or external supplier within the set period
Action
displays the requests for which an action escalation alert has been activated
Select one or more filters, as required.
Resolution Breach
displays the requests that have not been resolved within the time specified by the SLA applied to the request
Resolution
displays the requests for which a resolve escalation alert has been activated
Action Breach
displays the requests which have not been actioned by the proper group or external supplier within the set period
Action
displays the requests for which an action escalation alert has been activated
Suspended Requests
To view all suspended requests that you own, that have been forwarded to you, or that have been forwarded internally by you.
A request is classified as suspended if an analyst selected the Suspended option when forwarding a request. The Physical Status column indicates the action that is expected to be taken on the request. Taking action on a request does not remove its suspended status. To manually remove suspension on a request, use the button on the toolbar.
This view includes the same filtering options as the Requests Outstanding view.
Suspended Group's Requests
To view all suspended requests that are owned by group(s) to which you belong, that have been forwarded to your groups, or that have been forwarded internally by your groups.
This view has the same filtering options as the Your Group's Requests view.
Delegated Requests
You must be nominated as a delegate to use this view. If you are linked to more than one delegator, select the delegator whose requests you want to see from the Delegator drop-down list.
To view the requests delegated to you by all delegators, select All Delegators from the Delegator field.
You can use the following filters in this view:
Forward to Delegator
displays the requests that have been forwarded to the delegator but have not been actioned
Forward Internally by Delegator
displays the requests that have been forwarded internally by the delegator but have not been actioned
Forward to Delegator Group
displays the requests that have been forwarded to groups of which the delegator is a member but which have not been actioned
Delegator Requests
displays the requests that are owned by the delegator
Forward to Delegator
displays the requests that have been forwarded to the delegator but have not been actioned
Forward Internally by Delegator
displays the requests that have been forwarded internally by the delegator but have not been actioned
Forward to Delegator Group
displays the requests that have been forwarded to groups of which the delegator is a member but which have not been actioned
The following columns are useful when viewing requests. You can configure the columns if you wish to add/remove/reorder them:
SLA
display escalation states for Service Level Agreements. The escalation states alert you about impending escalation and breaches on agreement events
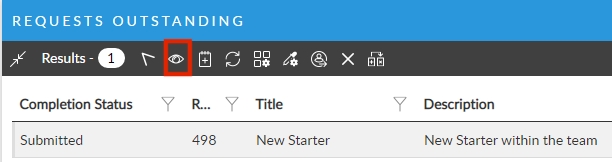
To review a request without taking ownership of it, select the request and then select the eye icon.
The Request Details window appears for that request. When in Review mode, you can attach a note to the request or send an email from the request. To take over the request (that is, take ownership of it), click Take Action on the Request Details window.
You must have Request Take Over selected in the Requests tab of your Workflow Management security role to be able to take over a request. In ASM, work associated to a request is done on the relevant task that will be assigned to you or your team and not on the request itself. The request holds all the dependent work items - it is a container for the process. See Searching for tasks for more information.
To take action on a request directly from the Requests Outstanding window, select the request and then select . If the request belongs to you, it opens in Action mode. If it belongs to another analyst, it opens in Review mode and you must click Take Action to take ownership of the request.
ASM Core allows an organization to create filters in order to reduce the number of requests in an analyst’s Requests Outstanding window. Filters effectively function as a set of personal folders into which an analyst can organize requests into meaningful groups.
Each analyst can creating their own folders, which will only apply to the way they view requests. Alternatively, the system administrator can create a series of folders and make them available to all workflow management analysts.
Using filters does not change the ownership or any other aspect of a request. Filters simply provide another way in which to view requests in your Requests Outstanding window.
Anne Weston is an analyst using ASM Core and wants to use filters in order to customize the groups in which she chooses to view her requests. She organizes her requests into the groups “Requests due by the end of the week” and “Requests sent from Marketing”.
Select the Filters view on the left pane of the Requests Outstanding window.
Enter a name for the new filter in the text area above the list of existing filters.
Select All Analysts to make this filter name available to all analysts when they view their Requests Outstanding window.
Click to the right of the filter name. The new filter is added to the list of existing filters.
Highlight the filter to which you want to add requests.
Click the Requests Outstanding or Your Group’s Requests view.
Highlight the requests you want to add to the filter, using the Shift and/or Ctrl keys to select multiple requests.
Go back to the Filters view.
In the list on the left pane, highlight the filter to which you want to add the request/s.
Click Update. The selected request is copied into the chosen filter.
The request(s) remain displayed in the Requests Outstanding or Your Group’s Requests view.
Select the filter in the list (make sure you have the Filter view option selected).
Type the new filter name in the text field.
Click Update to change the name of the filter.
Select the request.
Click Remove on the left panel.
Select the name of the filter in the filter list.
Click .