
Jira Connector
The Jira connector supports a single integration source for multiple projects.
Alemba is currently reviewing and updating the whole of the connector section, including all subsections. Expect this section to be updated by end of June, 2025.
This topic provides details for the Jira connector, including:
The name of the .NET assembly file
The connection methodology
Use case scenarios
Details for creating an Integration Source and Outbound Actions.
Architectural and functional details that ensure the running of the use case through the Inbound and Outbound action functionality of the Integration Platform.
Details on mandatory fields, restricted fields, and how to map list item field values.
Examples for using transforms, profile maps and resolution rules.
Steps for creating a Jira issue from an ASM Call or from a ASM workflow task.
How the updates are handled between the Jira issue and ASM call/task.
How to cancel the Jira issue from ASM and how to close the ASM call/task from Jira.
The Alemba®.Connector.Jira.icnf needs to be configured before using the Jira Connector. For assistance configuring the ICNF file, contact your Account Manager to engage an Alemba® Professional Services Consultant.
For compatibility and version support details, refer to the ASM Connector Matrix.
You should familiarize yourself with the information in Installing Connectors before installing any connectors, and read the Integration topics for more information on how to configure them.
Connector Overview
You can create an issue in Jira from a call or task in Alemba Service Manager™. The Jira issue is synchronized with its originating ASM call or task, so that changes made in either product can be reflected in both products.
You can use this connector with Jira Cloud or the installed version.
The Jira connector:
Sends transactions to the Jira REST API to perform actions such as creating issues in Jira, updating fields and comments in the issue, and updating issue status.
Retrieves transactions from Jira at polling intervals (ASM Connector Service) to perform actions such as updating fields or adding notes to the ASM call or task.
The type of action performed is part of the Integration Platform settings, creating adequate transactions, ensuring proper communication, and maintaining reconciled information between ASM and Jira.
This connector can be used with the cloud version of Jira and the installed version.
Use Case Scenario
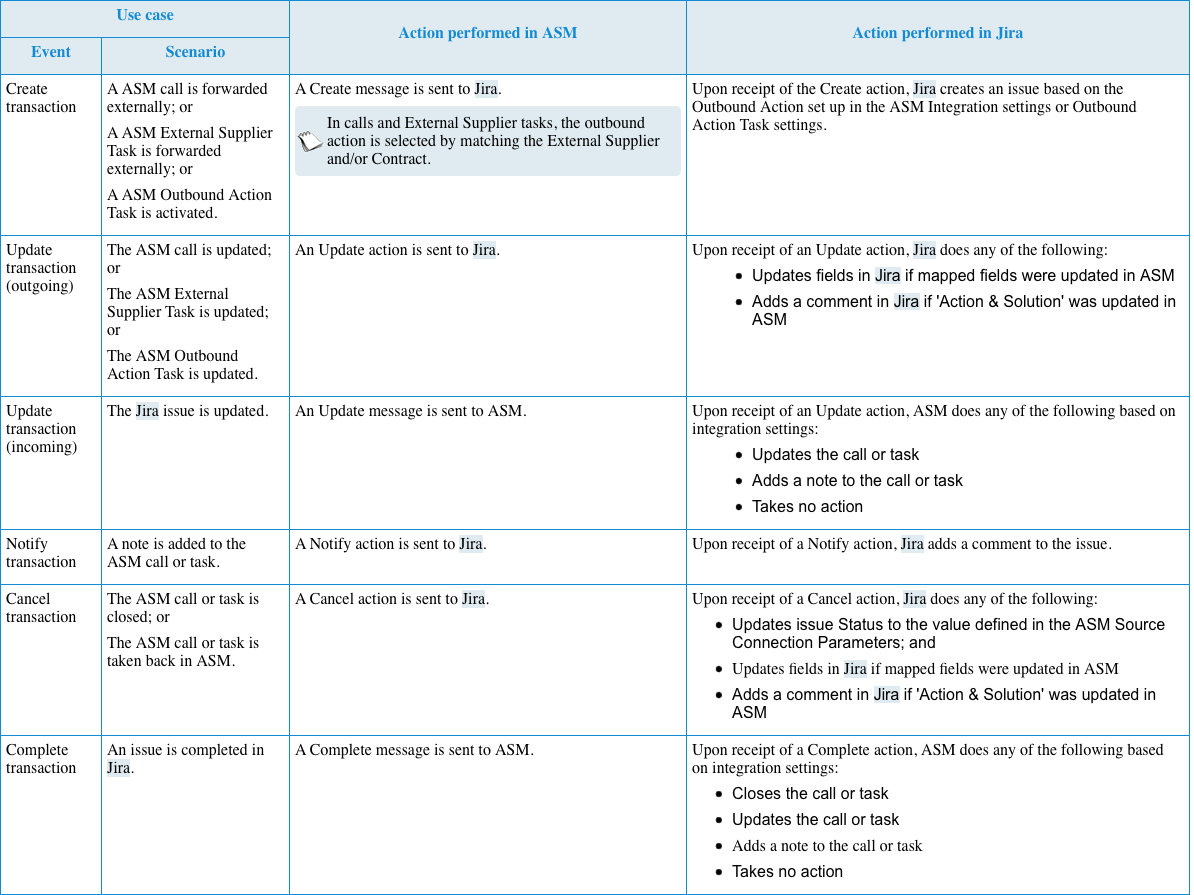
The interoperability concept can be broken down into several use cases that are listed in the table below.
Connector Description
The table below provides a description of the Jira Connector.
Information fields
Name
Connector name
Atlassian JIRA Connector
Third-party application
Atlassian Jira
Assembly
Alemba®.Connector.Jira.dll
Configuration file
Alemba®.Connector.Jira.icnf
Operation Method
Jira REST API
Connection Parameters
Connection parameters
Description
URL
The address for the Jira system. For Jira Cloud, enter the web address. For installed Jira, use the server address.
https://myJIRAsystem.atlassian.net
https://myJIRAserver
Login ID
The Username of a Jira user, not their email address. This user must have sufficient rights to the project(s) and issue type(s), as well as issue create, edit and transition permissions.
Password
The password of the user defined in the Login ID.
Action and Communication Protocol
The connector allows issues to be created in Jira based on information sent by ASM. The creation and update of issues relies on actions being implemented between Jira and ASM. These actions are supported by a particular communication protocol composed of a set of specific transactions, as illustrated below.
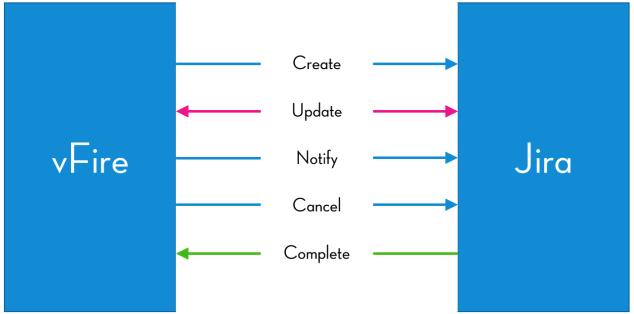
ASM sends a Create message to initiate an action for Jira to perform.
Both ASM and Jira can send Update messages to each other when required.
ASM can send Notify messages to Jira when required.
ASM can send a Cancel message to stop any further processing of the issue in Jira.
A Complete message is sent by Jira when the issue is successfully completed.
Connector Requirements
Ensure the port for the REST API is open in the firewall. The default port is 443 for https.
Ensure the content type application/json is accessible through the firewall.
The Alemba®.Connector.Jira.icnf needs to be configured before creating the Integration Source for Jira. Developer Notes for the Jira ICNF are available for developers experienced in customizing ICNF files. For assistance with the ICNF file, contact your Account Manager to engage an Alemba® Professional Services Consultant.
Installation
No install is required for this connector. This connector is visible in the Integration module, ready to be configured.
Diagnostics
The connector has the facility to trace information. The data can be obtained through Polling tracing or Application tracing.
Additional Information
This connector does not include any Federated CMDB population functionality.
Connector Operation
Steps required to make the Jira connector available for use:
Verify the REST API is Accessible from the ASM server.
Configure the Alemba®.Connector.Jira.icnf file, as explained here.
Configure ASM Core with a Source for Jira.
Configure ASM Core for Outbound actions.
Verify the REST API is Accessible
In a web browser, enter the endpoint address from the connector source connection details and append /rest/api/2/serverInfo. (case sensitive)
https://myJIRAsystem.atlassian.net/rest/api/2/serverInfo
The following page should be returned:

If this page is not returned there may be a blocked port on the firewall. Contact your Network Administration team to resolve.
The Jira connector requires the configured port to be open on the firewalls between servers, including application/json messages. The default ports are 80 for http and 443 for https.
Configure a Source for Jira
Before you start
The Alemba®.Connector.Jira.icnf file needs to be configured before creating the Source for Jira. For assistance configuring the ICNF file, contact your Account Manager to engage an Alemba® Professional Services Consultant.
Select ≡ > Admin > Integration.
In the Explorer pane, under Integration, select Sources.
Select the button on the toolbar. In the pop up window, select Atlassian JIRA Connector from the drop-down list.
In the Integration Source Details window, complete the details.
Status
This field is pre-filled with the Active status
Connector
This field is pre-filled with the Connector type
Assembly.TypeName
This field is pre-filled based on the selected connector as defined in the Connector DLL, and is read-only
JIRA Credentials
URL
Type the address for the Jira system. For Jira Cloud enter the web address. For installed Jira use the server address.
Login ID
Enter the Username of a Jira user. This user needs access to the project(s) and issue type(s), as well as issue create, edit and transition permissions.
Password
Enter the password of the user defined in the Login ID.
Further fields are displayed on this window, but you do not need to complete them at this stage.
Select the button on the toolbar to test the connection.
After 3 failed login attempts Jira may block the account and require a 'CAPTCHA' validation before unblocking it. Use a web browser to log into Jira with that login ID to complete the validation, and then attempt another test connect from the connector source.
Save the details.
If the Source details are later changed, the ASM Connector Service must be restarted in order for the changes to take effect.
Configure the Outbound Actions
Outbound Actions are used by calls that are forwarded externally and by External Supplier tasks that are forwarded externally. The outbound action is selected by matching the external supplier and/or contract in the call or task to the external supplier and/or contract in the Outbound Action.
Outbound Action Tasks do not use these settings, and instead contain their own set of mappings which are configurable through the task in the workflow template.
Before you start
The Outbound Actions checkbox must be enabled in the Integration Platform Settings.
The integration Source for the Jira connector must be configured.
Select ≡ > Admin > Integration.
In the Explorer pane, under Integration, select Outbound Actions.
In the Filter by Source field, select the Jira source name from the drop-down list; for example if you created a source with the title "My Jira Connector", this will be displayed in the list.
All available outbound actions are listed in the browse table. Choose the one you want to work with and then select .
The Outbound Action Type [action name] window appears.
To create a new mapping select New
To edit an existing mapping, select the mapping and then select Open
In the Mapping window, complete the details.
Screen Set
Select a call or External Supplier task screen set from the multi-tiered list. The screen set determines the fields that will be available for this mapping under the Fields - Outgoing and Fields - Incoming tabs.
Outbound Action Tasks do not use these settings, and instead contain their own set of mappings which are configurable through the task in the workflow template.
Call screen set
Select to enable the Outbound Action to trigger when a call is forwarded externally. Call screen sets are defined by your system administrator.
External Supplier screen set
Select to enable the Outbound Action to trigger when an External Supplier task is forwarded externally. External Supplier task screen sets are defined by your system administrator.
If you change the screen set after defining outgoing or incoming field mappings, a warning appears indicating that some field mappings may become invalid.
To associate an external supplier and contract with the Outbound Action mapping, complete the details in the Suppliers & Contracts tab.
Contract
Select a contract.
If you do not specify a contract, the Outbound Action will be matched by the external supplier only.
Select Add to add the external supplier and/or contract to the browse table. Whenever a call is forwarded to that external supplier and/or contract, this Outbound Action mapping will be applied.
Select the Action tab and ensure that the rules for Incoming and Outgoing Transactions using this mapping are as wanted.
The standard Jira REST API generates only two types of incoming transactions: Updated and Completed
Select the Fields - Outgoing tab and specify how field values from the ASM Core call must correlate with the field values in Jira when an outgoing message is sent by ASM Core.
To map a field, click Add. In the Add Fields window, select the fields (from Jira) you want to map to fields on the call/task, and click OK. On the browse table, click the corresponding cell in the Internal Field column. Then click the field selector button to pick a static value or a field relating to the screen set you selected earlier (including any custom fields created in ASM Designer).
Depending on the field’s data type, additional options can be selected in the field selector, including: field transformations, profile maps, or resolution rules. You can only select a field that is compatible with the field specified in the Action Field column.
Select the Fields – Incoming tab and specify how the field values from Jira must match the field values on the call or task in ASM when an incoming message is received by ASM Core.
To map a field, click Add. In the Add Fields window, select the fields from the selected Screen Set (including any custom fields created in ASM Designer), you want to map to fields used in the external system. On the browse table, click the corresponding cell in the Action Field column. Then click the field selector button to pick a static value or a field from Jira. These fields are defined at the level of the connector.
Depending on the field’s data type, additional options can be selected in the field selector, including: field transformations, profile maps, or resolution rules.
In the Update column, select the conditions for populating the field on the call/task.
Always
always matches the ASM field value with the value in Jira. This means that any change to this field in Jira automatically updates the field value in ASM.
Only When Blank
only populates the ASM Core field with the value Jira if the field in ASM is blank. This means that an existing value on the ASM call or task cannot be overridden by a field value in Jira.
On Initial Population Only
is not relevant for Outbound Actions
Save the mapping and the outbound action.
You cannot specify the same supplier and contract (per screen set) for more than one Outbound Action mapping. However, you can link an external supplier to one mapping and the same supplier plus a contract to another mapping.
In this case, the most specific mapping will be applied: if the call/task is forwarded to a supplier and contract matching the supplier and contract specified on the second mapping, this mapping will be applied. If not, it will use the default mapping for that supplier.
Field Mappings
This section provides information on how to map fields between ASM and Jira, limitations of certain fields, and examples for creating profile maps, resolution rules, and using transforms.
Mapping Fields between ASM and Jira
Mandatory Fields
All mandatory fields in Jira must be included in the ASM field mappings Fields - Outgoing tab.
If mandatory fields are not populated during Create transactions and Update transactions, the transactions will fail and the Jira issue will not be created created or updated.
By default, only the Summary field is mandatory in Jira. However other fields can also be set as mandatory within Jira by the Jira administrator. In this case, those fields must also be mapped as outgoing fields.
At a minimum the Jira Summary field must be mapped as an Outgoing field.
List Item Fields
The following Jira fields do not display a list of available list items in the ASM field mappings Fields - Outgoing tab. When mapping to these fields, enter the name of the Jira list item as a value into the field mappings, or map to a ASM field that contains the name of the Jira list item.
The values for these fields must already exist in Jira. Sending an unknown value to Jira will cause the Jira issue creation to fail.
Person fields (e.g.: Reported By)
When mapping to person fields in Jira, enter the person's Jira Username as a value, or map to a ASM field that contains their Jira Username. This value must already exist in Jira.
When the Reported By field is not mapped, it is automatically populated in Jira as the person record used in the Integration Source settings.
Version
Requires the name of the Jira list item (not the reference number); for example, if the Version field in Jira contains a list of versions that includes "ABC v9.0" you must pass "ABC v9.0" to Jira.
Label
Requires the exact name of the Jira value you want in the field. This value must already exist in Jira.
Security
Requires the exact name of the Jira value you want in the field. This value must already exist in Jira.
Restricted Fields
The following fields cannot be changed in Jira through field mappings and are not available in the Fields - Outgoing tab:
Project
This value must be defined in the Alemba®.Connector.Jira.icnf file.
Issue Type
This value must be defined in the Alemba®.Connector.Jira.icnf file.
Comments
Updated each time the ASM Action & Solution field is updated in a call or task, or when a note is added to a call or task in ASM.
Resolution
Automatically set by Jira.
For assistance with configuring the Alemba®.Connector.Jira.icnf file contact your Account Manager to engage an Alemba® Professional Services Consultant.
Ongoing Operation
Once the interoperability has been set up, Jira issues can be created from ASM calls or ASM workflows.
The ASM Connector Service must be running.
ASM Call to a Jira Issue
Follow these steps to transfer a call from ASM to Jira as a new issue:
Open the call that is intended to be transferred.
Click External to forward the call externally.
Specify the External Supplier and the Contract defined for Jira See Configure the Outbound Actions. Click Forward to Supplier to transfer the call to Jira.
Once the call has been transferred, a button labeled Take Back is visible on the Call Details page. This button allows for the cancellation of the Jira issue and disables the reconciliation of information between the ASM call and Jira issue. The status of the Jira issue is updated as defined in the Jira Connector Source settings.
If you are the contract manager for the external supplier you want to forward the call to, you can forward the call directly to that supplier.
If you are not the contract manager for the external supplier, you first need to forward the call to a contract manager, who will then forward the call to the supplier.
Linking an Analyst to a Contract
You may discover that when you forward a call externally and select the External Supplier and Contract that no analysts are available to forward the call or task. To resolve this:
Create an external contact
Create and link a contract to the external contact.
Link the contract to all analysts who will be externally forwarding the call.
ASM Workflow Task to a Jira Issue
Two workflow tasks can be used to create issues and trigger actions in Jira:
External Supplier task
Specific external supplier and contract pairs have to be detailed in the External Supplier Task in the workflow template before it can execute in the request. In this case, settings for field mappings defined in the Outbound Actions page of the Integration platform are used when information is transferred to the Receiver system.
Outbound Action task
The Outbound Action Task in the workflow template enables the choice of a source and an action, as well as to define a task-specific mapping to be used by the selected action. These actions are executed when the task activates in the request.
When a note is added to the parent request of these tasks, the Comment field in Jira is updated.
Updates between Jira and ASM
It is not possible to transfer objects/Attachments between ASM and Jira.
Update Intervals
The ASM Connector Service retrieves updates from Jira at polling service intervals. When there are multiple updates to a Jira issue within a single polling interval, that update will appear in the ASM call or task as a single update.
ASM Call History and Jira Issue Comments
The Jira Comment field is updated from ASM when data is added to the task or call using the Action & Solution field, or when a Note is added to a task, call or request. No field mapping is required for the Action & Solution field or for Add Note.
The ASM call or task history is updated when a comment is added to the Jira issue, to show that comments were added, however the Comment text is not displayed in the history. Use field mappings to display the Jira Comment text in a ASM text area field on the ASM call or task screen.
Canceling a Jira Issue
On a ASM call or task, performing a Take Back or Close action will update the status of the Jira issue (as defined in the Alemba®.Connector.Jira.icnf file), and break the link between them; essentially 'canceling' the Jira issue. No further updates will occur between issue and call/task. If the ASM call or task is forwarded externally again, a new Jira issue is created.
Changes are not saved upon selecting Take Back. Save any updates to the call before using the Take Back button.
For assistance with configuring the Alemba®.Connector.Jira.icnf file contact your Account Manager to engage an Alemba® Professional Services Consultant.
Closing a ASM call or task from Jira
Completing a Jira issue updates the ASM call or External Supplier task based on the Incoming Actions settings defined in the Action tab of the mapped Outbound Action. Depending on those settings the call/task may be updated, have a note added, perform no action, or be closed. In order to close a call or complete a task, the Close option must be selected. The options Update, Add Note, or Take no action will not close the call or task.
ASM Outbound Action Tasks do not allow configuration of incoming actions; completed Jira issues always perform a Complete transaction on the Outbound Action Task.
When a Complete transaction is sent to a ASM task, the task closes, its color changes to green, and any success paths in the workflow are activated.
Field mappings can be used to set call or task closure field values when the Jira issue is completed, such as Closure Reasons.
Last updated
Was this helpful?