Tutorial for Configuring the Database Resources Connector
The Database Resources Connector is a highly configurable connector that enables ASM Core to import resources from external databases.
About the Database Resources Connector
The connector requires configuration of the associated ICNF file within the ASM Core folder structure so that it can cater for any schema in third-party databases. This connector can import external resource data into ASM Core as Configuration Items, Services, Service Actions, Person records, Knowledge articles, Organization, Location, Cost Center, and Contract records. The connector can retrieve data from many tables in a database and define links and views for the elements imported.
The Database Resources Connector comes standard with ASM Core. No additional steps are required for it to appear in the list of connectors on the Integration Connectors window.
Resources cannot be imported until the associated ICNF file has been configured for the target database.
About this tutorial
This tutorial has been provided as a guide on how to configure the ICNF file for this connector. For further assistance with configuring your ICNF file, contact your Account Manager to engage an Alemba® Professional Services Consultant.
This tutorial takes you through steps for configuring the ICNF file for the Database Resources Connector so that resource data can be retrieved from external databases and imported into ASM Core. A sample database for MS SQL Server is provided and used in this tutorial as a reference for those steps.
The tutorial is organized into 5 sets of steps representing the 5 major modifications to the ICNF file
Stage 0
The base ICNF file.
Stage 1
Contains code to import records of one resource type.
Stage 2
Contains code to import records of a second resource type.
Stage 3
Contains code to define links between imported resources.
Stage 4
Contains code defining views to expose external data
Files required for this tutorial
File Name
Purpose
Alemba®.Connector.SQL.FedCMDB.DemoData.sql
Creates the sample database schema and content. Download and extract the file.
Alemba®.Connector.SQL.FedCMDB.icnf
Code change steps are performed in this file. The base version of this file comes standard with ASM Core.
Stage 0 - The base ICNF file
On the web server where ASM Core is installed, navigate to the Config folder of the ASM System directory.
Open Alemba®.Connector.SQL.FedCMDB.icnf. At this stage it contains only generic code for the connector with no code for resources, fields, or links.

Step 1: Set up the database for the tutorial
In SQL Server Management Studio create a new database with the database name of Sample.
In the blank database Sample, open and execute
This creates basic tables for a sample environment with data and linkages. The tables are:
Computers – data records for computers, such as Desktop 01, Notebook 02
ComputerLink – links computers with computers
Devices – data records for devices, such as phones
DeviceLink – links devices with computers and the last updated date
Software – data records for software, such as MS Word
ComputerSoftware – links software with computers and contains install date data
Step 2: Configure ASM Core to connect to the database
In ASM Core, create a Source for the Database Resources Connector, complete the database connection details, and confirm the test connect is successful.
Stage 1 - Modify the ICNF to expose and import one resource type
Step 1:
Open Alemba®.Connector.SQL.FedCMDB.icnf. Identify the line pair that contain <resources> and </resources> respectively. Between these two lines, insert code from steps 2 and 3 below. Code from steps 4 and 5 is inserted between the lines that contain </resources> and </connector> respectively.

Step 2: Define the table schema that contains data for Computers
Add code to the icnf file as shown in the image below, from line 7 to 16. This defines the table schema for the Computers table.

Step 3: Define the names of the queries that will retrieve data from the Computers table.
Add code to the icnf file as shown in the image below, from line 17 to 24.
For this tutorial the query names are “Computer Search”, “Computer All”, and “Computer Retrieve”.

Step 4: Define the fields to be exposed corresponding to the query results
Add code to the icnf file as shown in the image below, from line 26 to 35. Ensure this code is added after the line that contains </resources>.

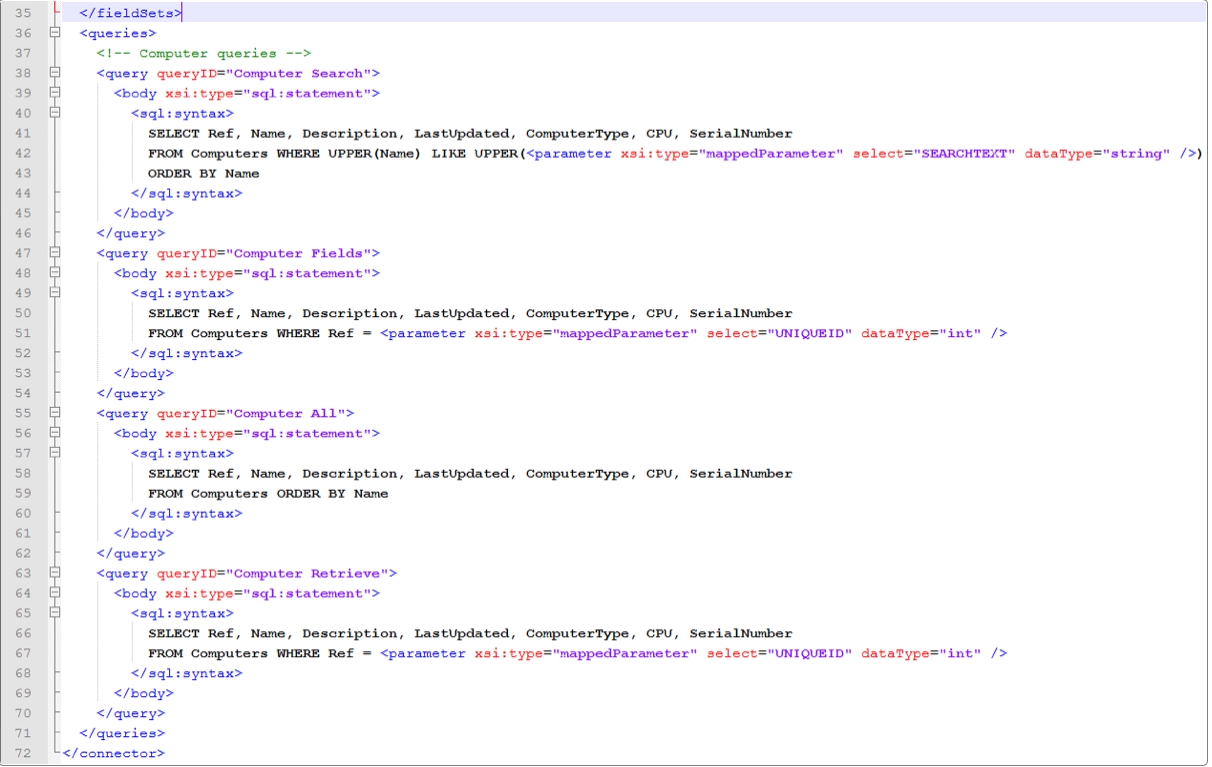
Step 5: Define the queries for each of the query names defined in step 3 above
Add code to the icnf file as shown in the image below, from line 36 to 71.
Step 6: Apply the ICNF file and import the resource
Copy the updated icnf file to the Config folder in the ASM System directory; overwrite existing file when prompted. Restart the ASM Services and perform an IISreset to ensure the updated file is used.
In ASM Core, under Integration > Resources, select the source created in Stage 0 Step 2. Computer now appears as an available resource type.

Select Computer and create a new mapping. For the purpose of this tutorial configure the following options for the mapping:
On the Action tab of the Mapping window select 'CMDB Item' from the Import As field and select an appropriate CMDB template for the Using Template field.
On the Fields tab of the Mapping window map internal fields to the database fields that are exposed from the icnf file
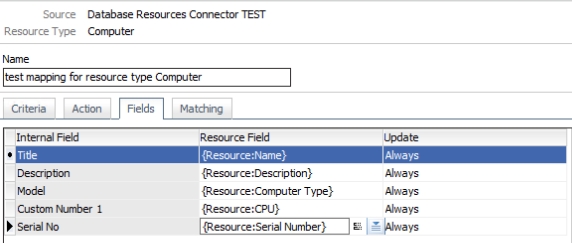
Schedule a full scan to import data from the Computers table into ASM Core using these mappings.
Stage 2 - Modify the ICNF to expose an additional resource type
Step 1:
Open the Alemba®.Connector.SQL.FedCMDB.icnf file that was modified during Stage 1. Code for the additional resource type is inserted into existing corresponding sections of the icnf file.
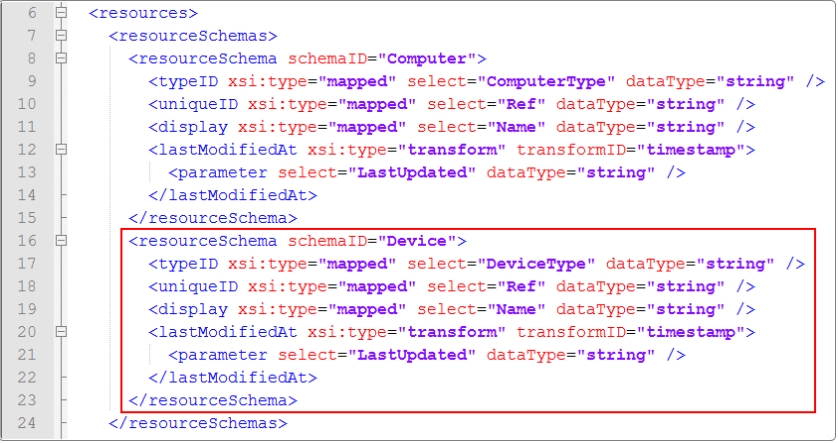
Step 2: Define the table schema that contains data for Devices
Add code to the icnf file as shown in the image below, from line 16 to 23. This defines the table schema for the Devices table.
Step 3: Define the names of the queries that will retrieve data from the Devices table.
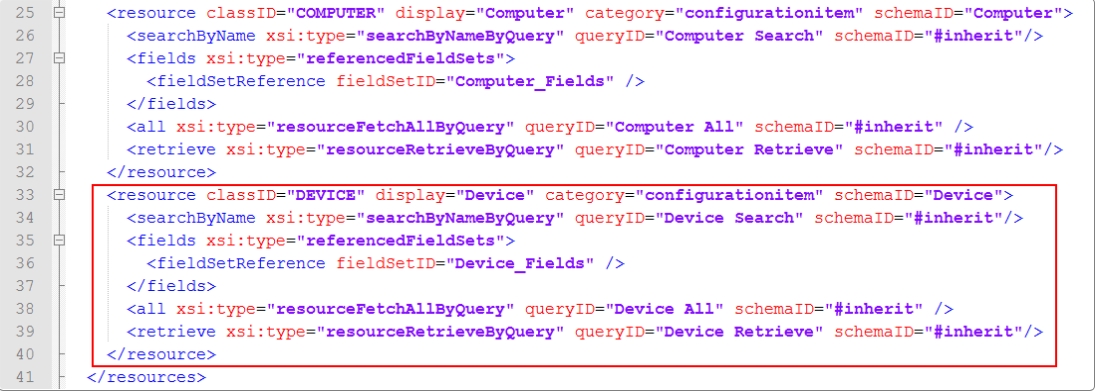
Add code to the icnf file as shown in the image below, from line 33 to 40.
For this tutorial the query names are “Device Search”, “Device All”, and “Device Retrieve”.
Step 4: Define the fields to be exposed corresponding to the query results
Add code to the icnf file as shown in the image below, from line 51 to 56. Ensure this code is added after the line that contains </resources>.

Step 5: Define the queries for each of the query names defined in step 3 above
Add code to the icnf file as shown in the image below, from line 93 to 126.
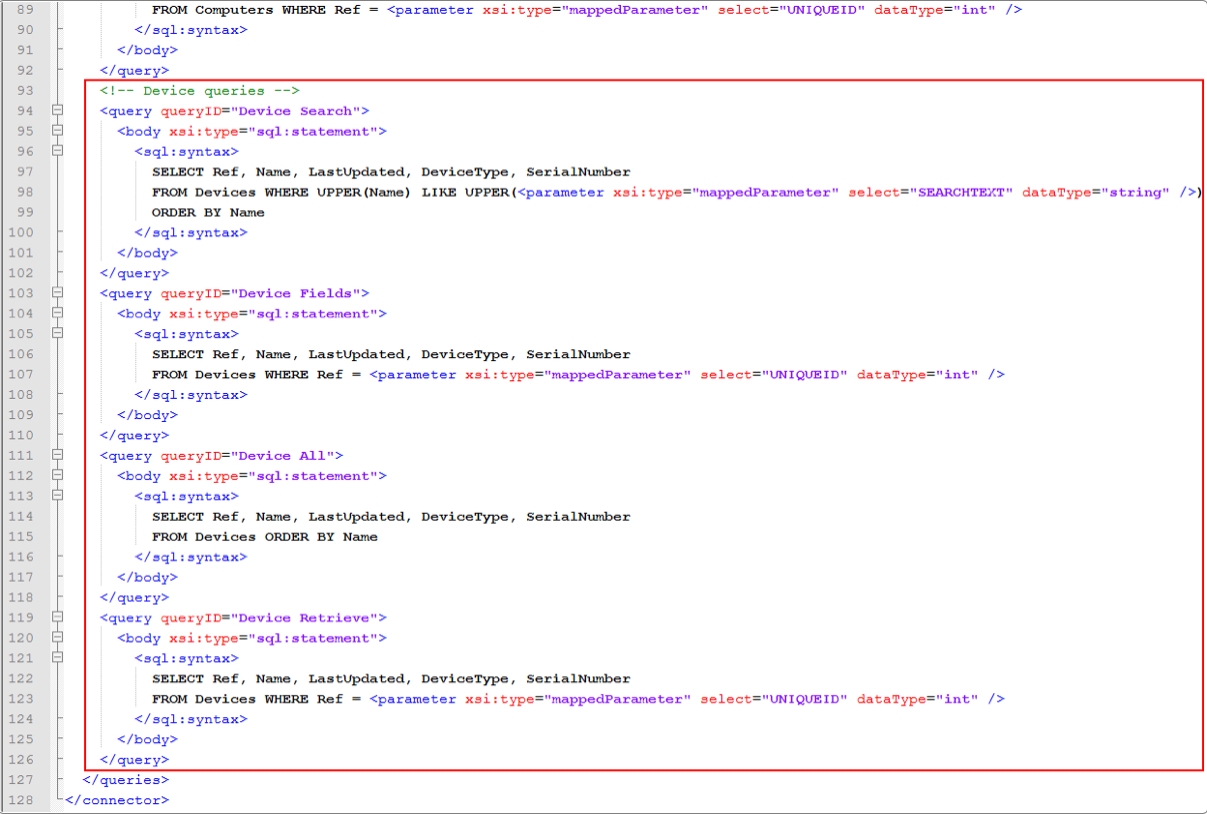
Step 6: Apply the ICNF file and import the resource
Copy the updated icnf file to the Config folder in the ASM System directory; overwrite existing file when prompted. Restart the ASM Services and perform an IISreset to ensure the updated file is used.
In ASM Core, under Integration > Resources, select the source created in Stage 0 Step 2. Device now appears as an available resource type.

Select Device and create a new mapping. For the purpose of this tutorial configure the following options for the mapping:
On the Action tab of the Mapping window select 'CMDB Item' from the Import As field and select an appropriate CMDB template for the Using Template field.
On the Fields tab of the Mapping window map internal fields to the database fields that are exposed from the icnf file
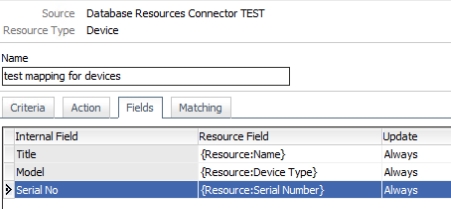
Schedule a full scan to import data from the Devices table into ASM Core using these mappings.
Stage 3 - Modify the ICNF file to define link types and expose links between resources
Step 1:
Open the Alemba®.Connector.SQL.FedCMDB.icnf file that was modified during Stage 2.
Step 2: Define links between the Computer and Device resources
Identify the line pair that contain </resource> and </resources> respectively. Between those lines add code to the icnf file as shown in the image below, from line 41 to 66.
For this tutorial Computers can be linked to Computers and Devices, but Devices can only be linked to Computers.
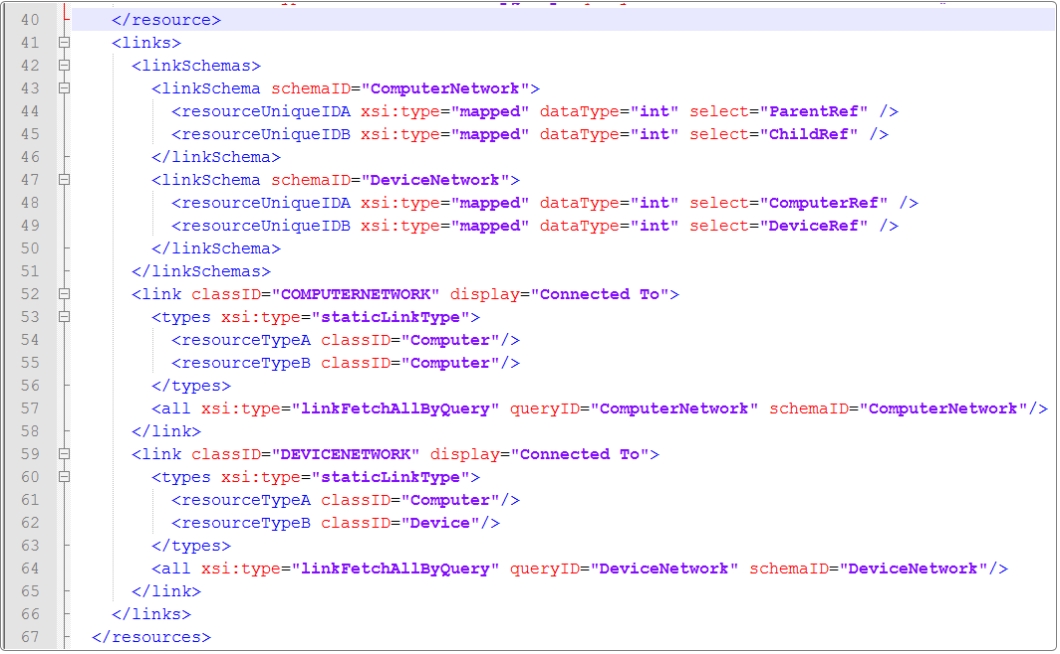
Step 3: Define the queries to identify the links
Identify the line pair that contain </query> and </queries> respectively. Between those lines add code as shown in the image below, from line 154 to 168.
For this tutorial the two columns returned in the query represent Resource Type A (Computer) and Resource Type B (Computer or Device).
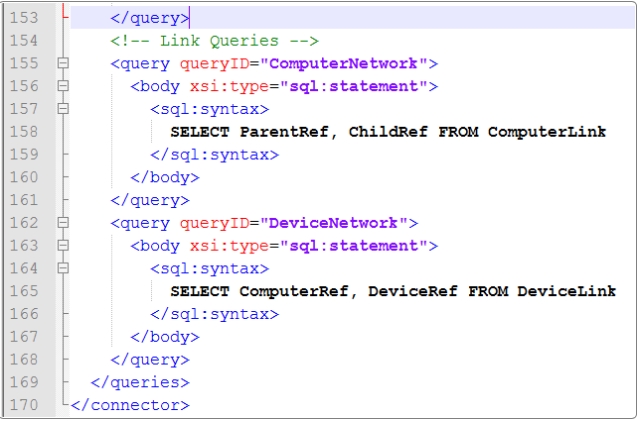
Step 4: Apply the ICNF file and define the links
Copy the updated icnf file to the Config folder in the ASM System directory; overwrite existing file when prompted. Restart the ASM Services and perform an IISreset to ensure the updated file is used.
In ASM Core, under Integration > Links, select the source created in Stage 0 Step 2. The links between Computers and Devices, and Computers and Computers, now appear.

For each link type, configure a link mapping. For the purpose of this tutorial select the Default mapping option.
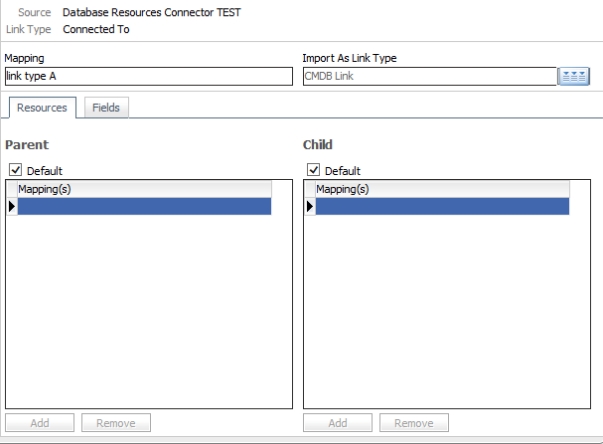
Schedule a full scan to create links between the imported resources in ASM Core.
Stage 4 - Modify the ICNF file to contain view definitions
Views can be added to the ICNF to display data from the database without importing that data into ASM Core. This is useful in cases such as when sets of data are constantly changing and a real-time view is required.
Step 1:
Open the Alemba®.Connector.SQL.FedCMDB.icnf file that was modified during Stage 3.
Step 2: Define the view ID for Software in the Computers resources
Within the resource section for Computers, add code to the icnf file as shown in the image below, from line 30 to 32.

Step 3: Define the fields to be exposed by the Software view
Within the fieldSets section, add code to the icnf file as shown in the image below, from line 86 to 90.
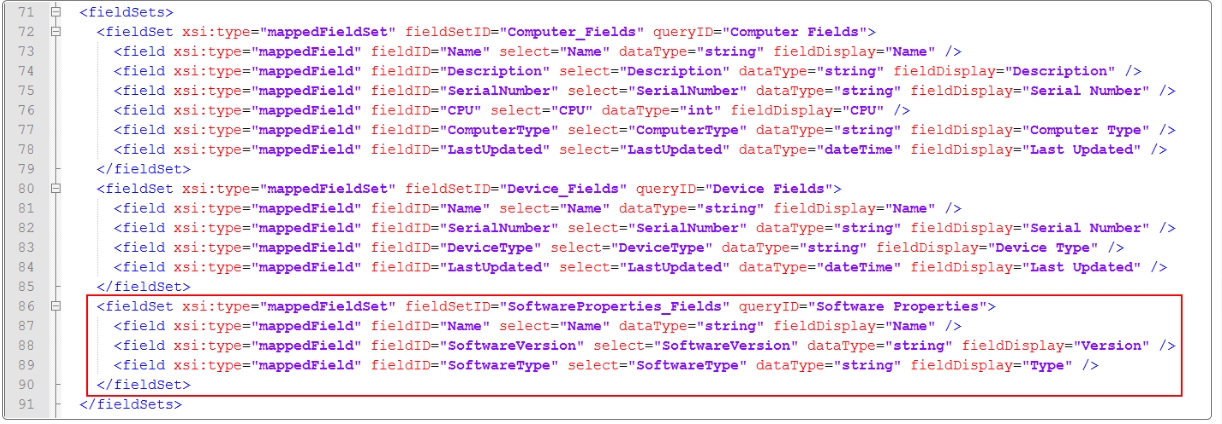
Step 4: Define the view schema for Software in the Computers resources
Identify the line pair that contain </fieldSets> and <queries> respectively. Between those lines add code as shown in the image below, from line 92 to 103.
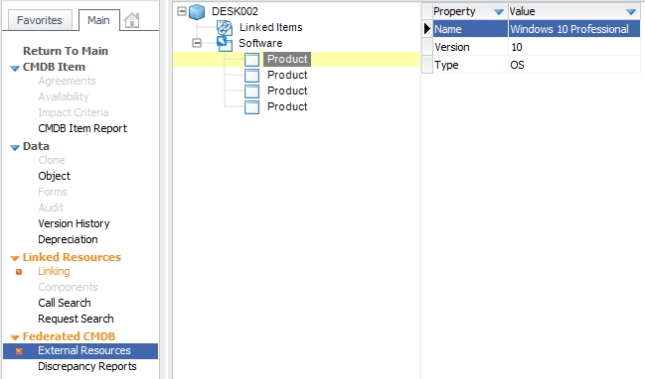
Views can be nested to expose tiered levels of data. There can be multiple levels of nesting. The nested view shown in the image below results in a Product tier (software item) under the Software tier. The Product tier contains details of the software application.
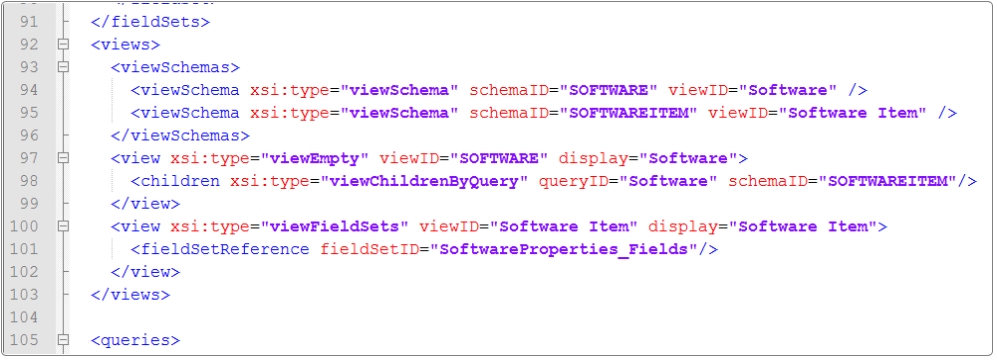
Step 5: Define queries for the Software view
Within the queries section, add code to the icnf file as shown in the image below, from line 189 to 206.
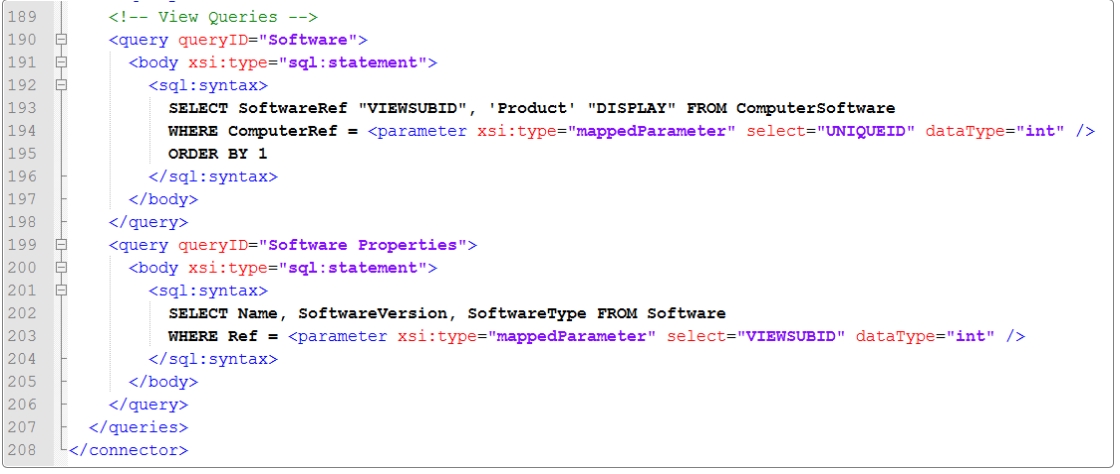
Step 6: Apply the ICNF file and define the links
Copy the updated icnf file to the Config folder in the ASM System directory; overwrite existing file when prompted. Restart the ASM Services and perform an IISreset to ensure the updated file is used.
In ASM Core, data exposed by the view appears in the External Resources window of imported CMDB Items.
Addendum - Enabling multiple integration sources for the connector
The Integration framework supports the concept of versions for connectors and underlying database schema. Versioning within the icnf file enables a single connector to have multiple integration sources configured, with each integration source exposing data from a different database and /or data schema.
The steps below provide a brief sample for enabling versioning in the icnf file.
Step 1: Insert the appVersion and Connector elements for the different sources
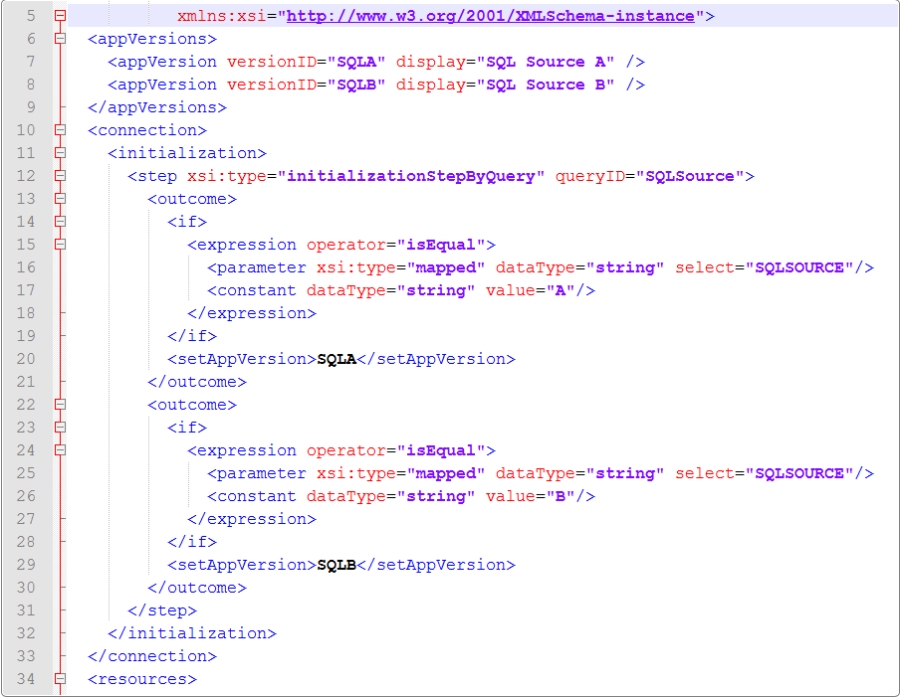
Identify the line pair that contain <xmlns:xsi="http://www.w3.org/2001/XMLSchema-instance"> and <resources> respectively. Between those lines add code as shown in the image below, from line 6 to 33.
For the purpose of this example the sources are two SQL Databases, referenced as SQL Source A and SQL Source B.
Step 2: Define queries for the different sources
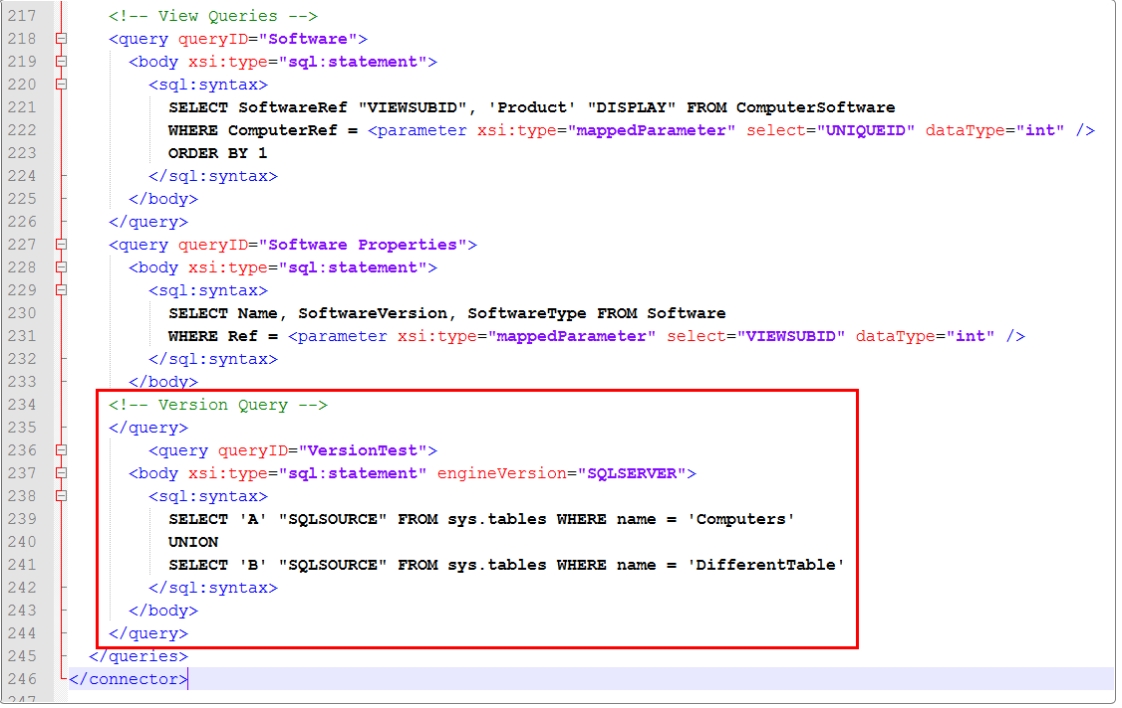
Within the queries section, add code to the icnf file as shown in the image below, from line 234 to 244.
The Integration framework supports engineVersion "SQLSERVER" or "ORACLE"
Step 3: Insert the forVersion attribute into the resource query name section
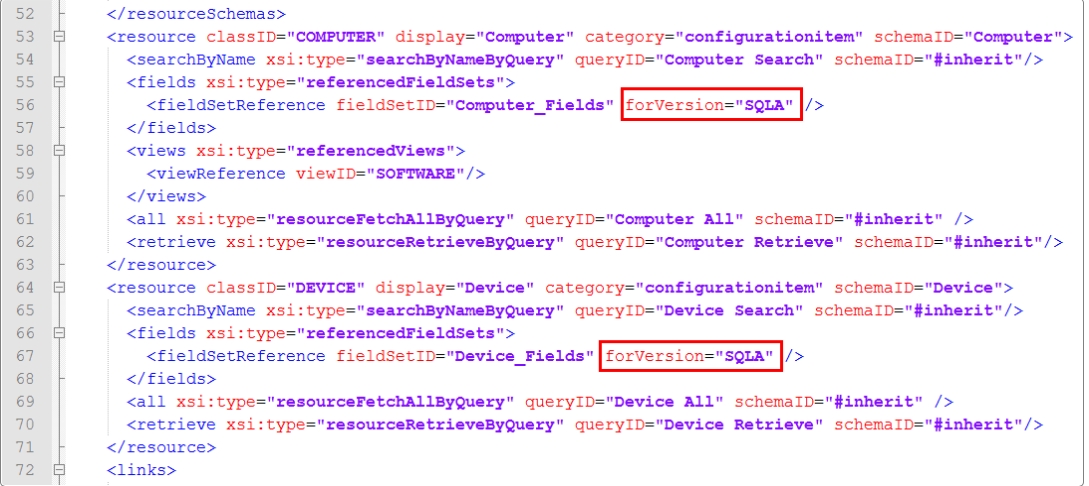
Within the resource section where the query names are defined, insert the forVersion attribute to identify the intended source. Add code to the icnf file as shown in the image below, to lines 56 and 67.
Last updated
Was this helpful?
