
Creating a Custom Field
If the field you require does not exist in ASM Core, you can create and add your own.
Custom fields can also be used in reporting, setting up rules for Conditional Branching tasks, and can be used to search for items in ASM Core.
Before you start
You must have Designer selected in your General Access security role before you can use this option.
To maintain an audit trail of changes made to screens, forms and message templates, Designer must be selected in the Auditing window.
Best Practice
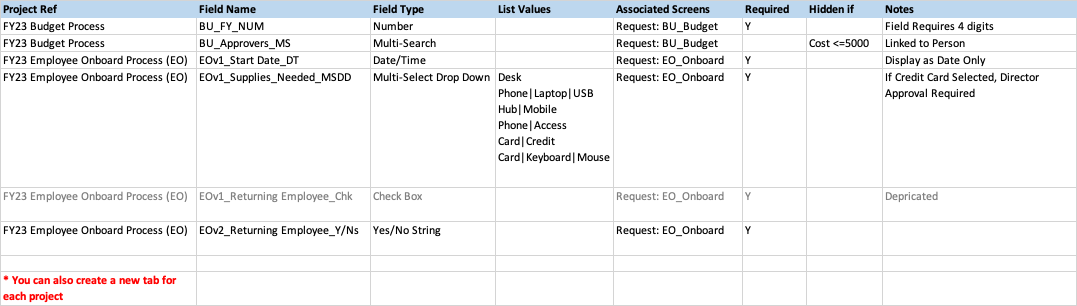
Keep a spreadsheet of all custom fields you create and the details for change control and planning purposes. This is also useful as a checklist against requirements.
You should create a CI called "ASM" and attach the spreadsheet to it, maintaining a complete change record and log of all the custom fields in perpetuity. You can also attach all other related documentation relevant to your software to the ASM CI in your CMDB. An example of a Custom Fields and Screens Spreadsheet is below - tailor it to your needs:
Best Practice
Choose a standard Naming Convention for all of your custom fields that includes: [Prefix]-[Body]-[Suffix]
This method will organize your fields logically and alphabetically in the field list table so that you can find them easily both when building your screen but also when writing queries and building rules in other screens and workflows.
PREFIX: a logical designator (Project, Acronym, etc...). You should include a Project designator/number, or an acronym for the process you are defining, or any other designator such as your own companies name (or abbreviation) in the field name. The important thing is that it makes sense to both you and other administrators that will come after you.
BODY: the name of the field
SUFFIX: the field type (Chk, Txt, Num, etc...) When developers are building integrations through the API, etc, including the field type in the DB name enables them to know exactly what field and field type they are calling.
IMPORTANT NOTE WHEN NAMING YOUR FIELDS
When creating fields in ASM Designer, it's crucial to avoid using certain special characters in the name such as:
Period (.) Used to delineate object names (tables) and can lead to parsing errors
Comma (,). Used by SQL when parsing and can cause unexpected behavior
Percent Sign/Symbol (%) Used in LIKE clauses for pattern matching
Dollar Sign/Symbol ($). Used in SQL to denote an internal system catalog view
At Sign/Symbol (@) the @ symbol is used to declare a variable
Double quotes (") Used for string literals
Single Quotes (') Used for object identifiers
Forward Slash and Back Slash (/ and \ ) Arithmetic operators and escape characters.
Semicolon (;): Used to separate statements.
Square brackets ([ ]): Used in LIKE clauses for pattern matching.
Asterisk (*): Used in SELECT statements to select all columns.
Double-Hyphen (--): Used for comments when doubled (--), and can be misinterpreted.
Plus (+), minus (-): Arithmetic operators.
These characters are reserved and have special significance in SQL, the language used for managing and manipulating databases. If these characters are included in a field name, particularly at the start. They are automatically added to the database name as is. Their use can lead to potential issues or errors in SQL operations because these characters might be interpreted in a way that was not intended, affecting the execution of SQL commands. A common observation, for example, is that rules with a comma in the rule name are often "invisible" and inaccessible through thee UI.
To ensure smooth operation and to avoid database errors, it's recommended to refrain from using these characters in names. A better option is to use the Underscore (_).
The examples below use an acronym that flags the process and illustrates the naming convention outlined above.
Example 1: You are doing an Employee Onboarding project. All the custom fields created for this project could be named like this - EOv1_[field name]_[field type]
EOv1_New Employee Name_TXT (Text Box - 255 Char)
EOv1_Returning Employee_CHK (Check Box)
EOv2_Returning Employee_Y/Ns (Yes/No String)
EOv1_Start Date_DT (Date Time)
EOv1_Special Access Required_Y/Ni (Yes/No Integer)
Note the 2 versions of the same field, "Returning Employee". Since projects usually involve several build, test, and fix/redeploy cycles, you may need to differentiate between iterations, sprints, or versions, of the same development project. This really depends on the scope of the project and your own organizations development practices.
Here, it was changed from a check box to a Yes/No string field in the second iteration. You could go back and delete the depricated field at some point, but during development cycles, simply versioning will suffice. Later cycles may want to reinstate the original field.
Example 2: You are creating a custom Screeen for Budget Requests. All the custom fields created for this screen could be named like this - BU_[field name]_[field type]
BU_FY_NUM (Number Field)
BU_Budget Amt_NUM (Number Field)
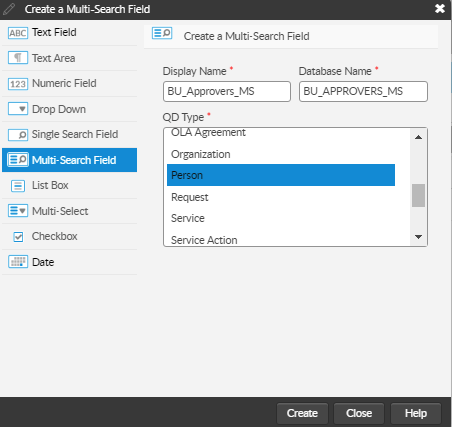
BU_Approvers_MS (Multi-Search List)
To Add a New Custom Field
In the left pane, select the Add a Field tab.
Select Create New in the left pane beneath the browse table of field types.
The Create a New Field window is displayed. Select the type of field you wish to create from the list in the left pane:
Text Area
Enables input of multiple lines of text.
Text Area custom fields cannot be used in rules for Conditional Branching tasks or in Rules Builder, and cannot be added as search criteria on Search windows.
Numeric Field
Enables input of numeric values – both integers and decimal fraction numbers.
Drop Down
Drop-down list fields can be used to create a list of values from which one can be chosen.
Select the list of values for the drop-down. You can either use an existing list of values (such as the Call Priority list), or you can create your own.
To use an existing list, select Assign an existing list and select a list, scrolling down if necessary. You can edit, copy or delete lists created in-house. (Standard lists can be edited in the relevant area of System Administration.)
To use vCloud CMDB item types, ensure that you select the (vCloud) CMDB Item Type. Selecting another CI type would not trigger the filtering mechanism that is possible with the (vCloud) CMDB type.
To create a new list and define your own values, select Create List and specify the list details.
Single Search Field
Enables the search and selection of one value in this field. The entity type configured for the QD field determines the type of items returned in the search and available for selection for the screen or submission form.
At QD Type, select the entity type you want to use. If you select a sub entity type (such as User which is a type of Person), then the values which can be selected in the QD field are limited to the sub type (that is, only person records designated as Users can be selected in a User entity type QD).
You can create the following:
· Analyst
· Call - available as of GAIA (ASM Version 10.4)
· CMDB Item
· Configuration Item
· Cost Center
· External Supplier
· IPK Group
· Knowledge - available as of GAIA (ASM Version 10.4)
· Location
· OLA Agreement
· Organization
· Person
· Request - available as of GAIA (ASM Version 10.4)
· Service
· Service Action
· Service Bundle
· SLA Agreement
· UC Agreement
· User
· Workflow Group
Multiple Search Field
Enables the search and selection of multiple values in this field. The entity type configured for the QD field determines the type of items returned in the search and available for selection for the screen or submission form. Using a QD field on a submission form within ASM Self Service is similar to using QD fields within ASM Core.
You can create the following:
· Analyst
· Analyst
· Call - available as of GAIA (ASM Version 10.4)
· CMDB Item
· Configuration Item
· Cost Center
· External Supplier
· IPK Group
· Knowledge - available as of GAIA (ASM Version 10.4)
· Location
· OLA Agreement
· Organization
· Person
· Request - available as of GAIA (ASM Version 10.4)
· Service
· Service Action
· Service Bundle
· SLA Agreement
· UC Agreement
· User
· Workflow Group
List box
List boxes can be used to create a list of values that are displayed on screen from which one can be chosen.
Select the list of values for the drop-down. You can either use an existing list of values (such as the Call Priority list), or you can create your own.
To use an existing list, select Assign an existing list and select a list, scrolling down if necessary. You can edit, copy or delete lists created in-house. (Standard lists can be edited in the relevant area of System Administration.)
To use vCloud CMDB item types, ensure that you select the (vCloud) CMDB Item Type. Selecting another CI type would not trigger the filtering mechanism that is possible with the (vCloud) CMDB type.
To create a new list and define your own values, select Create List and specify the list details.
Multi-Select
Like drop-downs, multi-select fields can be used to create a list of values. However, in this case one or more values can be selected from the list.
Select the list of values for the drop-down. You can either use an existing list of values (such as the Call Priority list), or you can create your own.
To use an existing list, select Assign an existing list and select a list, scrolling down if necessary. You can edit, copy or delete lists created in-house. (Standard lists can be edited in the relevant area of System Administration.)
To use vCloud CMDB item types, ensure that you select the (vCloud) CMDB Item Type. Selecting another CI type would not trigger the filtering mechanism that is possible with the (vCloud) CMDB type.
To create a new list and define your own values, select Create List and specify the list details.
Checkbox
Can be used to denote binary values. A checkbox can have only two states - it can either be selected or cleared.
Date
Enables input of a date in the field.
4. In the main part of the Create a [field type] window, complete the details:
Database Name
This is automatically completed using the Display Name. All alphabetical letters are converted to uppercase and spaces are converted to underscores to satisfy the naming convention requirement for fields in the database. The Database Name is the name by which the field will be referenced in database tables. This never changes, even if you change the Display Name later.
5. Select Create. The new field is added to the existing lists, in alphabetical order, and you will also see it in the list of fields in the left pane of the main window. The Create a [entity type] window stays open allowing you to create more fields.
6. Repeat for all the fields you wish to create, and then select Close.
Specifying List Details
The List Details window which appears when you are creating a field enables you to define a list of values for a Drop Down or List Box field. You can select an existing list or:
In the List Name field, specify a name for the list. Follow the same naming convention as you did for your field name.
Select Add to insert a new row in the browse table, and type the name of the value.
If you will be using these values to calculate the value of another field, for weighting or risk calculation, for example, enter a numerical value for the list item.
Repeat until you have defined all the values for the list.
To remove a value, select it and then Remove. To change the order in which a value appears in the list, select it and then Move Up or Move Down.
Select OK to save the list and return to the Create a Field window with your new list pre-selected.
Last updated
Was this helpful?