Configure Azure MS Graph API
Connect ASM to M365/Exchange Online using MS Graph API
Steps to connect ASM to M365 Email Accounts using the MS Graph API
Quick Start Guide (Download)
1. Create an App Registration in Azure Portal
Sign in to the Azure Portal (https://portal.azure.com) using an account with the correct permissions to create an App Registration e.g. an Administrator Account.
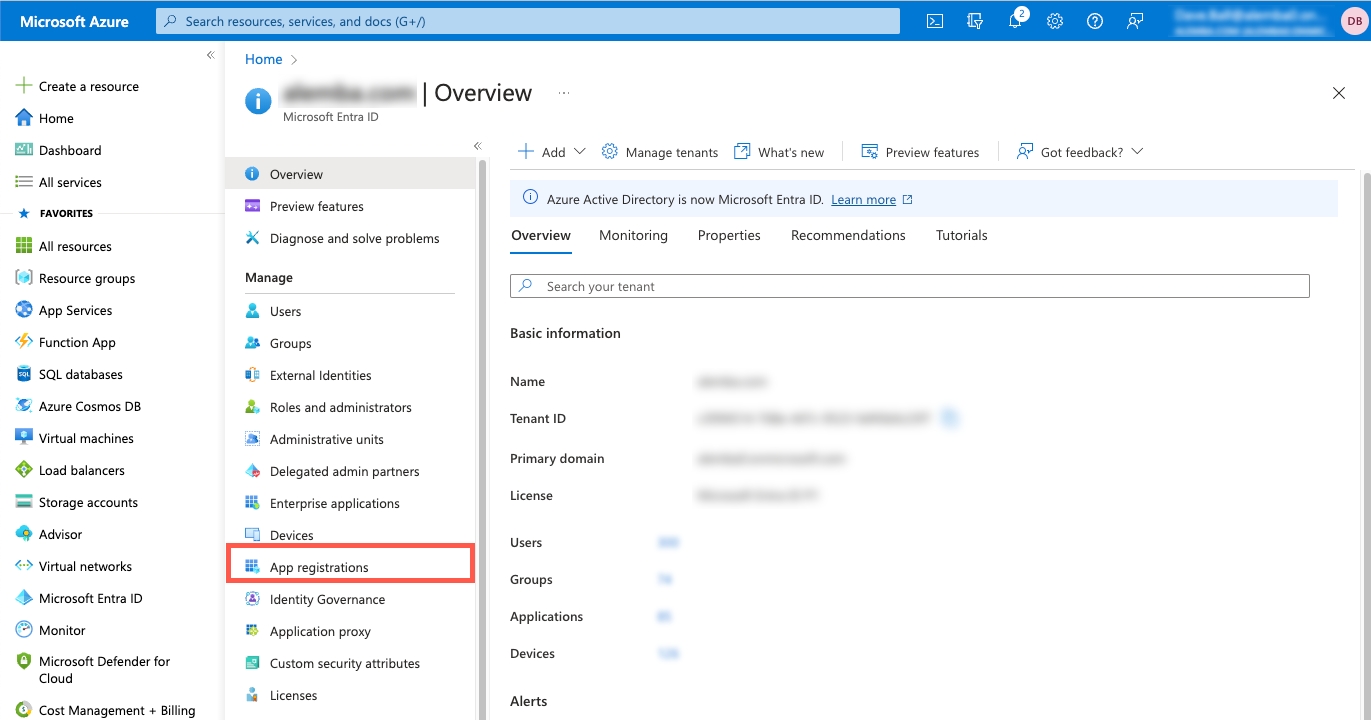
Select Azure Entra ID (previously Azure Active Directory)
Under Manage select App Registration
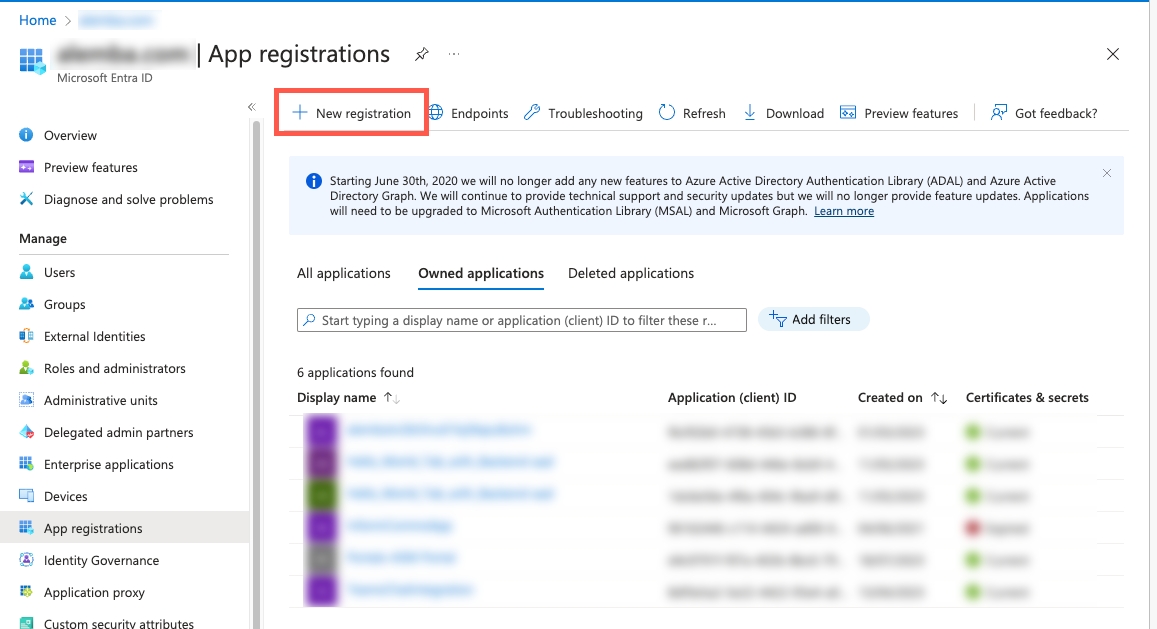
Click on New Registration
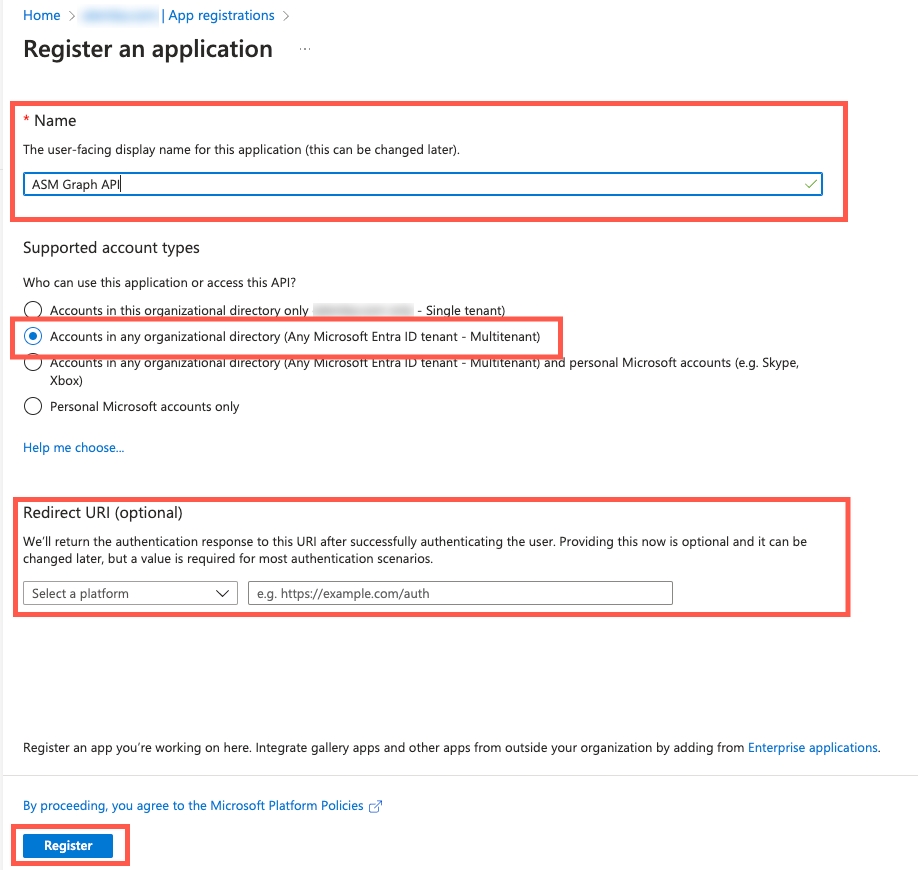
In the Register an Application screen enter your application's registration information:
In the Name section, enter an application name that will be displayed to the users.
Select Accounts in any organizational directory option from Supported account types section.
Set the Redirect URI (optional)
Click on Register to create the application.
The app registration will be created and then direct you to the App Registration Overview Page.
On the App Registration Overview screen, hover over Application (client) ID value, and select the Copy to clipboard icon to copy the value as you'll need to specify this in ASM.
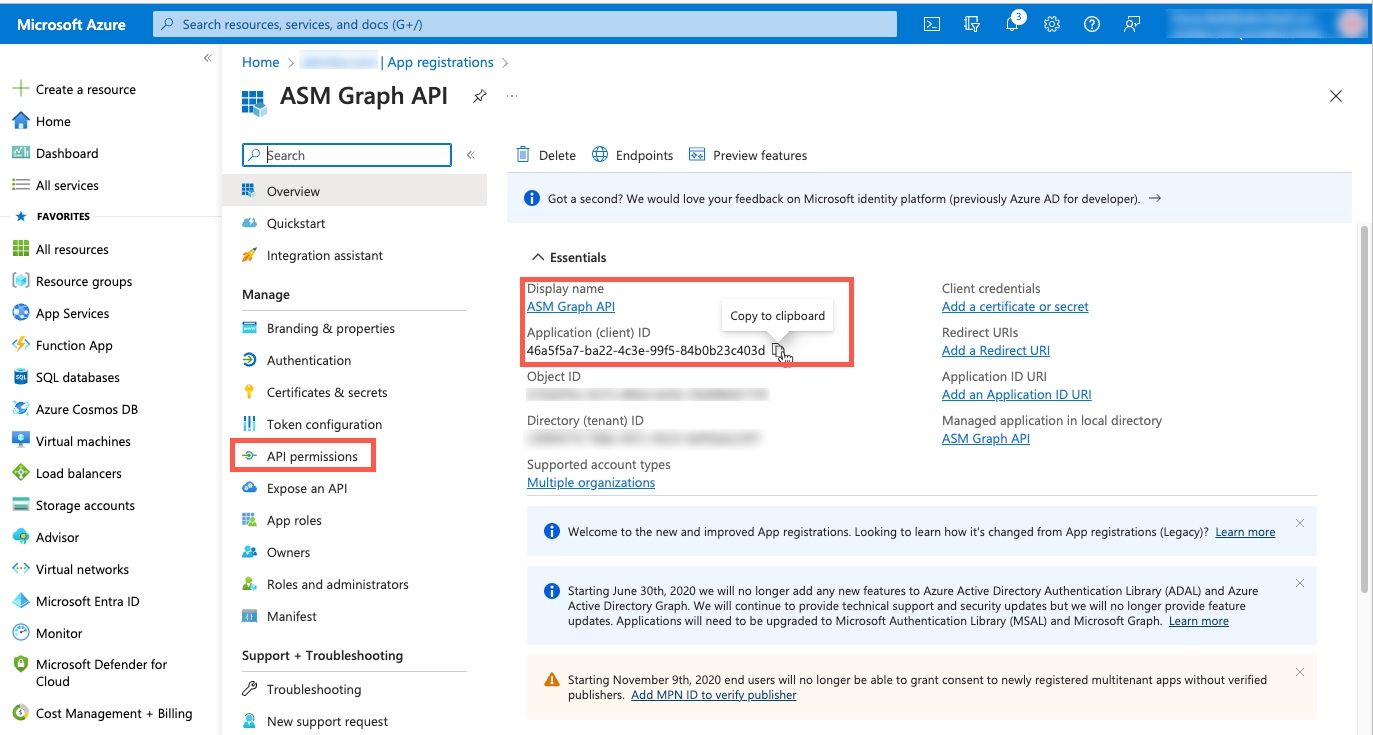
Under Manage, select API Permissions and proceed to Step 2.
2. Configure MS Graph API Permissions
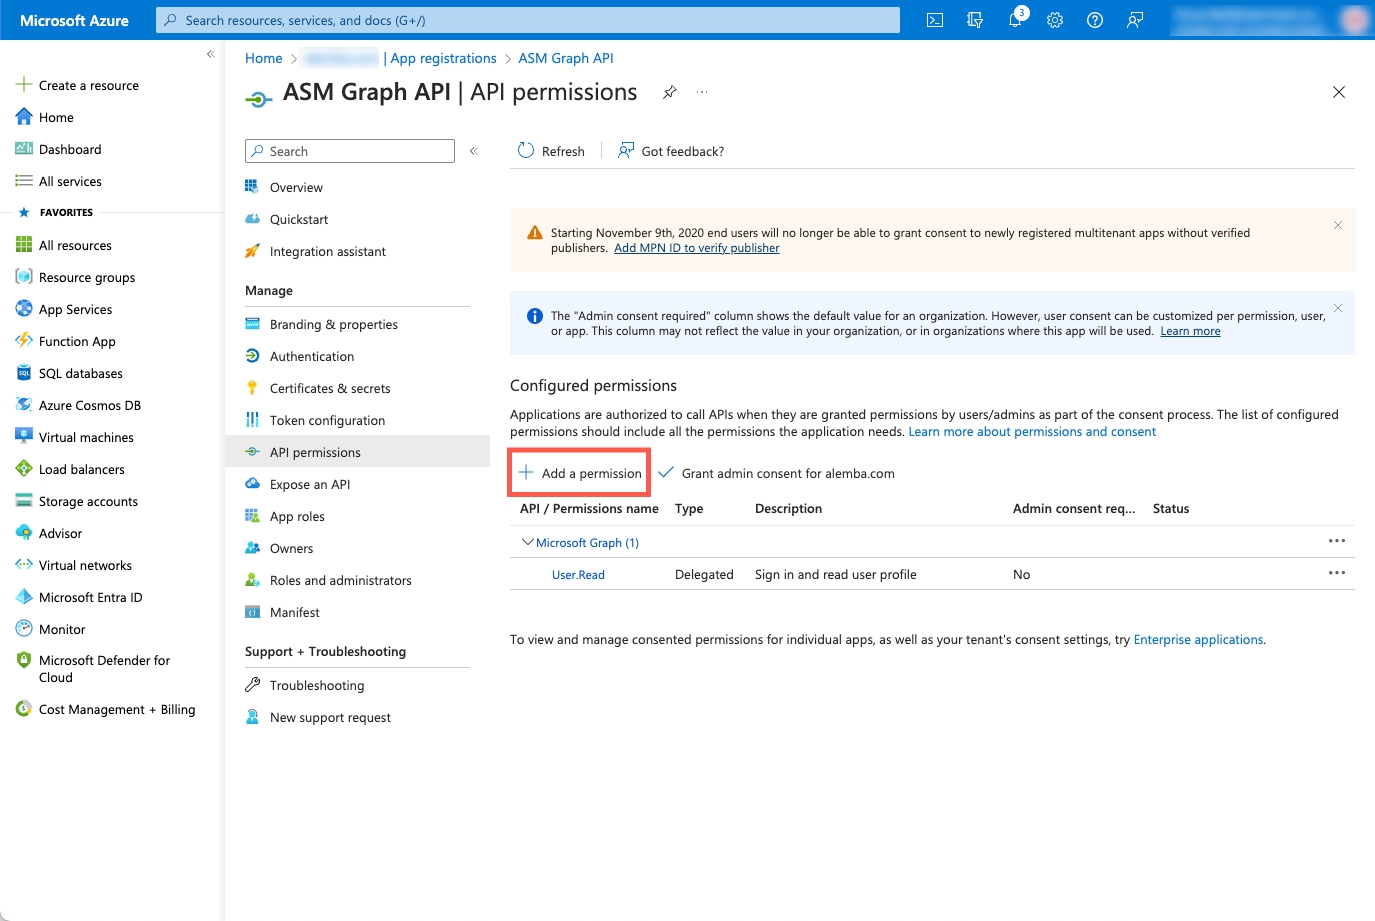
Under the Configured Permissions section select Add a Permission
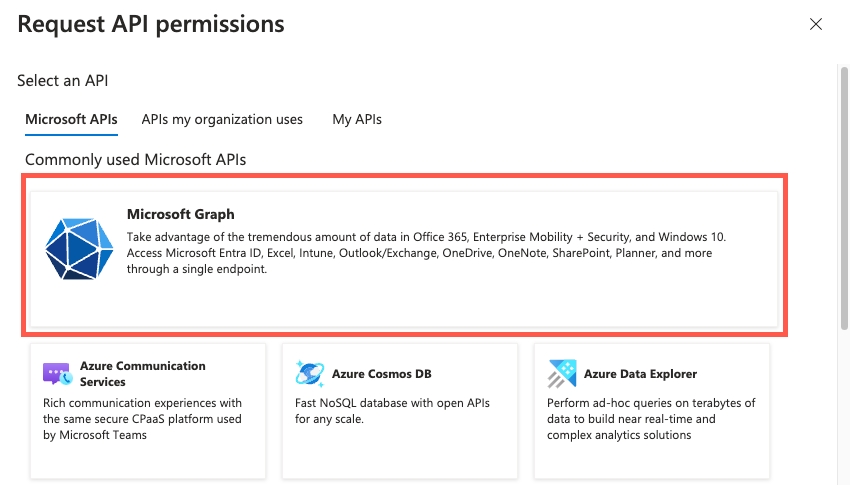
Select Microsoft APIs and then select Microsoft Graph
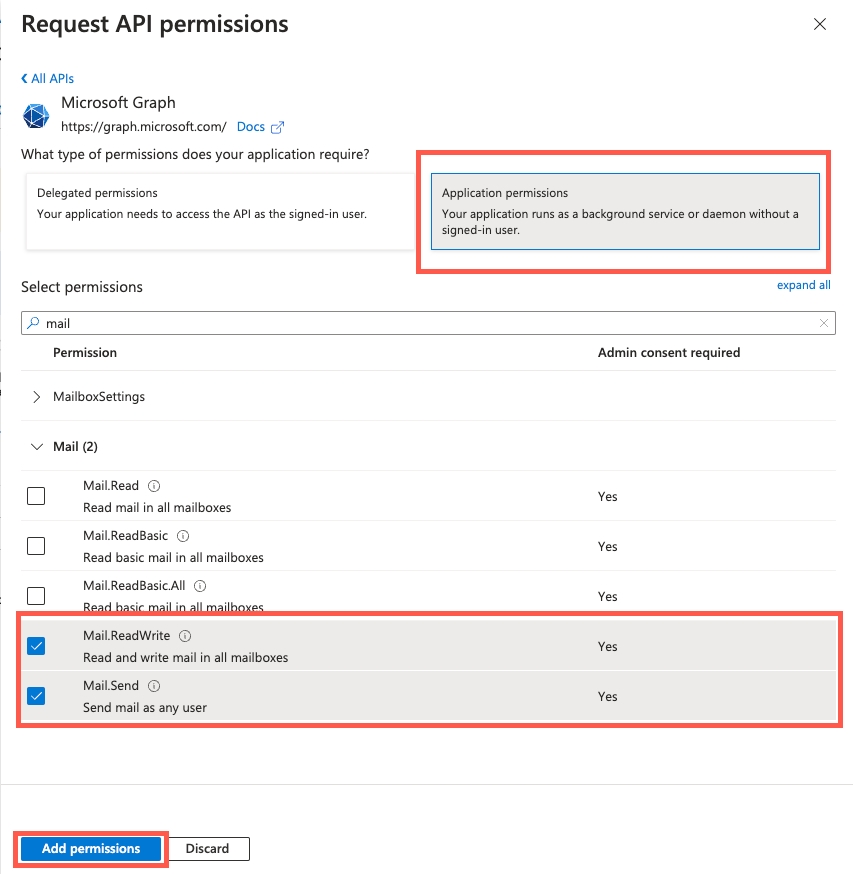
Select Application Permissions
In the Search field type 'mail'
Expand the options under Mail and enable the following permissions:

Press the Add permissions button to apply the API Permissions
3. Add a Client Secret
In the Azure Portal for the Application Registration create a new Client Secret by going to the Certificates & Secrets Menu:
Under Manage select Certificates & secrets
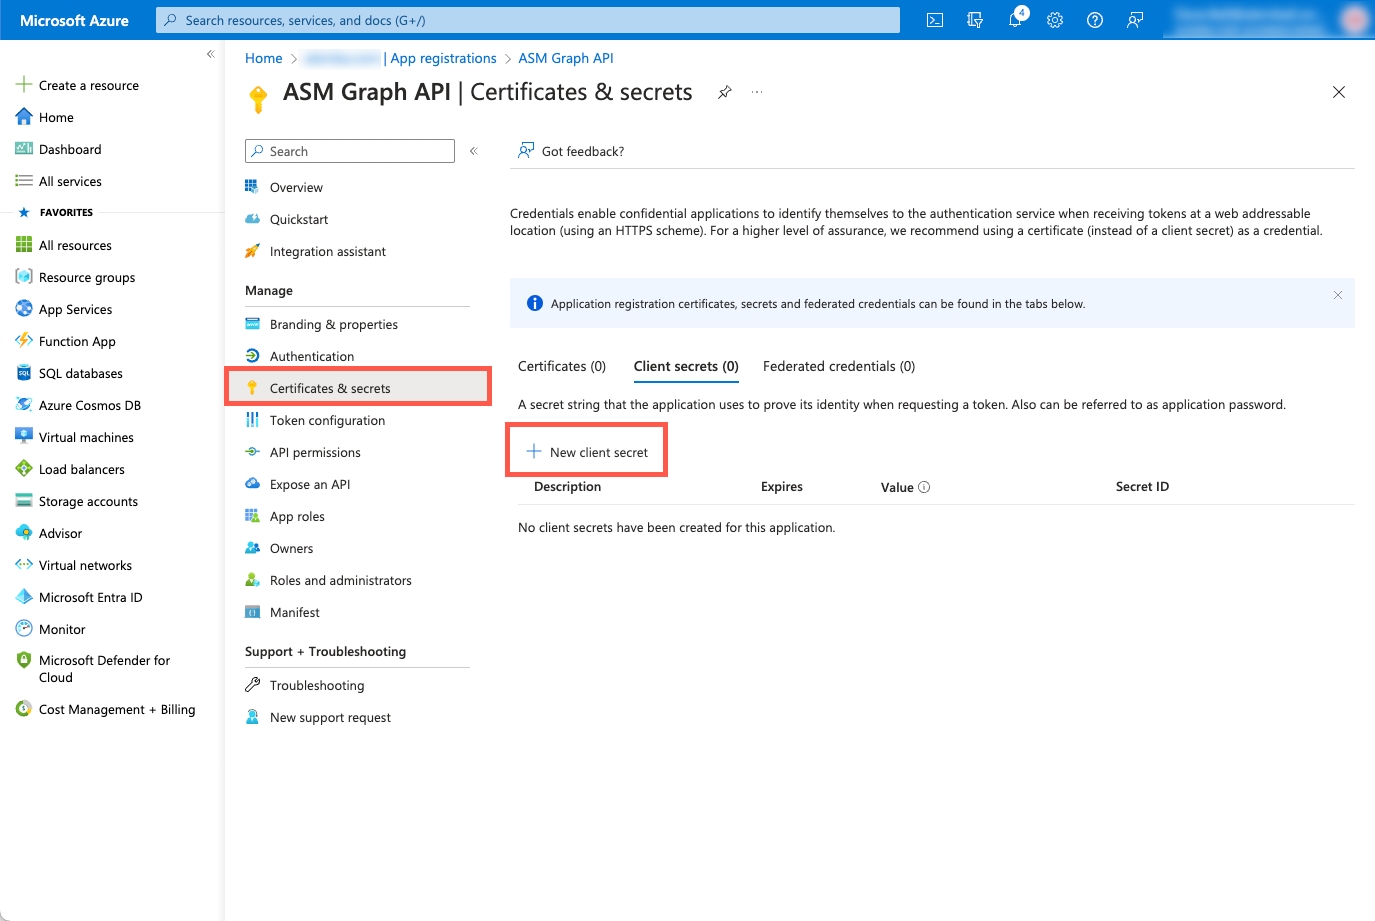
Select New Client Secret
Add a Name and choose an Expiry Date
The Client Secret Expiry Date can be set by default up to 24 months. Microsoft recommend that you do not set an expiry date higher than this period for Client Secret IDs.
Once the Client Secret ID has expired the ASM Email Accounts configurred will stop connecting to Exchange Online and emails will stop working until a valid Client Secret ID is configured in Azure Portal.
It is the Customers responsibility to track/manage the Client Secret ID's expiry date and renew in order to maintain service continuity.
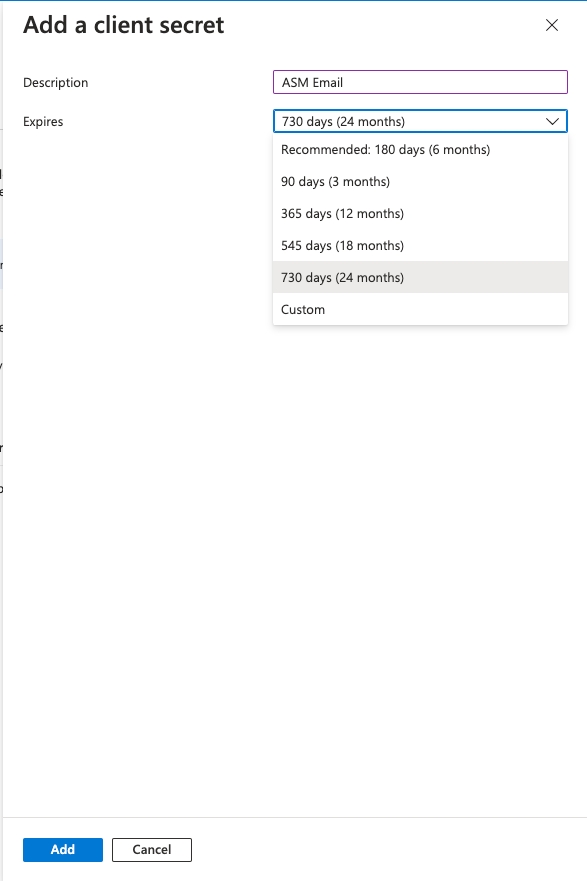
Press Add
Obtain the Client Secret ID from the Azure Portal by selecting the Copy to clipboard icon, to copy the value as you'll need to specify this in ASM.
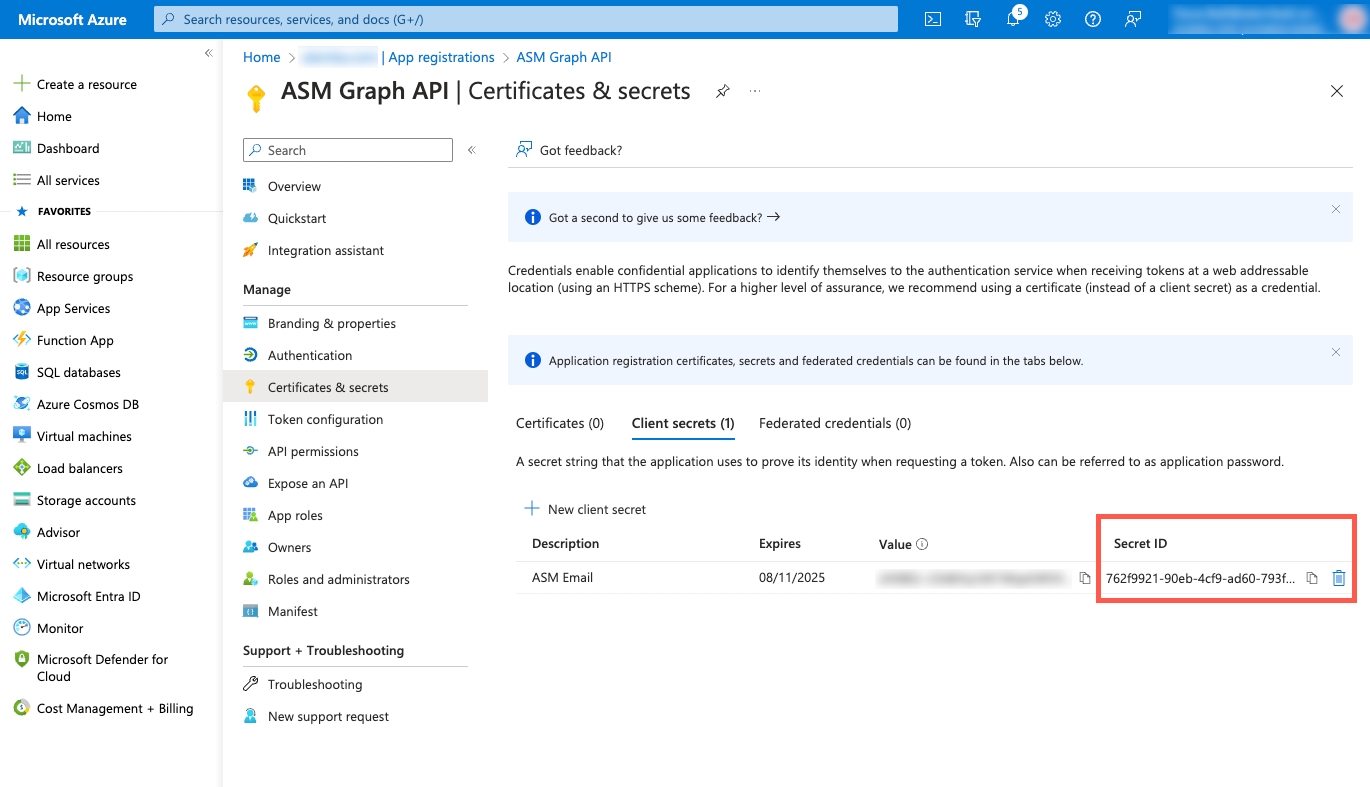
4. Limiting application permissions to specific Exchange Online mailboxes
The permissions required for this type of mail service could allow ASM to send and receive email from any mailbox.
In production environments, mailbox permissions should be limited to only allow sending and receiving from the required addresses.
Configuring permissions for Exchange Online mailboxes is beyond the scope of this document but further information is available here:https:
5. Configure ASM
Outgoing Email
Add a new Outgoing Mail server. Instructions on how to do this can be found here:
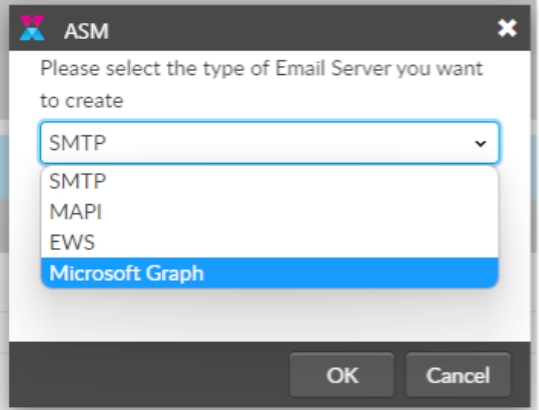
Copy the following values values from Azure Portal and use them to configure the ASM Email Server :
Tenant ID
Client ID
Client Secret
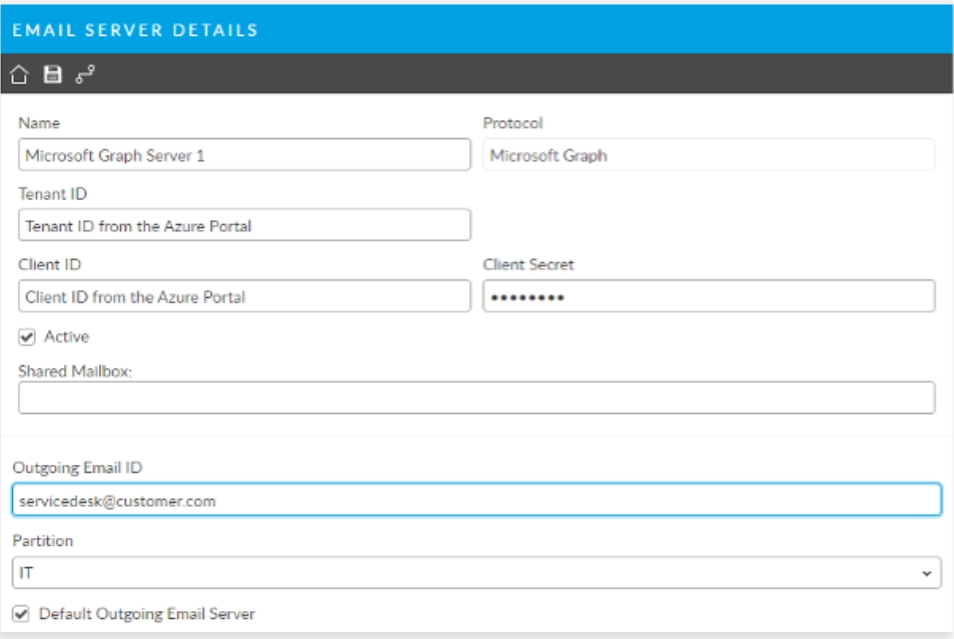
Complete the Details
Sent From Analyst Select this option if you want the email address of the Analyst triggering the email to appear in the From field of any emails sent from this server. If this option is cleared, the From field displays the email address specified in the Outgoing Email ID field.
Send Receipt Email Select this option to send a receipt with any emails sent from this mail server
Sent From Analysts Default Group Select this option if you want the email address of the Default Group of the Analyst triggering the email to appear in the From field of any emails sent from this server. If this option is cleared, the From field displays the email address specified in the Outgoing Email ID field. ** Use caution, as an analyst could belong to multiple groups and it could cause confusion if an analysts default group is IT Security, for example, but the analysts is working calls from another group he/she also belongs, like IT Support for example. In this case, the email being sent should be coming from IT Support as that is where the ticket is housed but this setting would send it from IT Security instead.
Reply to Forwarding Analyst Select this option if you want the email address of the Analyst triggering the outgoing email to appear in the To field, if the recipient decides to reply to the email. If this option is cleared, the To field displays the email address specified in the Outgoing Email ID field.
Reply to Forwarding Analysts Default Group Select this option if you want the email address of the Default Group of the Analyst triggering the email to appear in the To field if the recipient decides to reply to the email. If this option is cleared, the From field displays the email address specified in the Outgoing Email ID field. ** Use caution, as an analyst could belong to multiple groups and it could cause confusion if an analysts default group is IT Security, for example, but the analysts is also a member of IT Support and is working calls in that group. The email received will go to the Security group, the assigned analyst's default, and not the IT Support group.
Reply to From Address When enabled, the server will set "Reply-to" to "From" address for all emails. The existing "Reply to Forwarding Analyst" must be disabled when the new setting is enabled. Admins must ensure that replies can be accessed by ASM using either proxy addresses for a single mailbox or multiple incoming email servers.
Add Recipients as Stakeholders
Starting HERMES 10.2025.Q4 (10.6.9 GA Release) Administrators can configure the system to automatically add email recipients as either "Followers" or "Email Recipient" stakeholder types when sending emails. When the setting is enabled, recipients will be assigned the selected role and granted the associated notifications and access. Followers will have full notification access and can manage followed entities from the portal, while Email Recipients will only receive manual notifications.

Incoming Email
Add a new Incoming Mail Server in ASM. Instructions can be found here:
Copy the following values from the Azure Portal App Registration and use them to configure the ASM Incoming Email Server.:
Tenant ID
Client ID
Client Secret
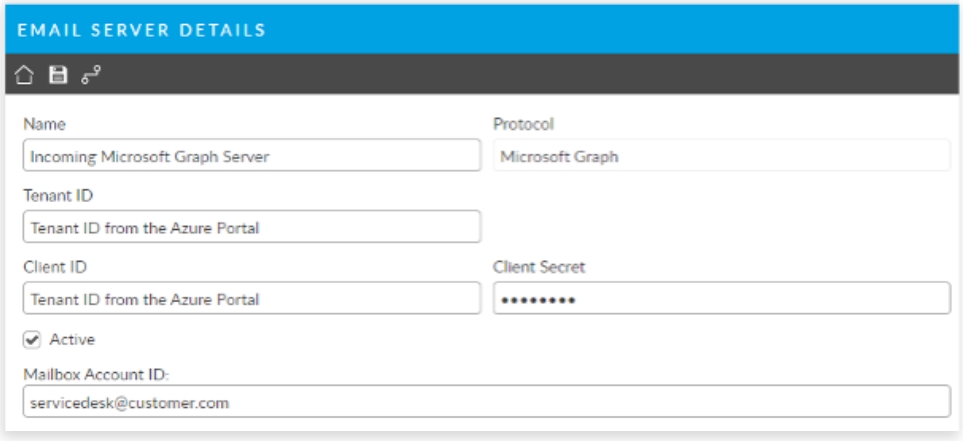
Complete the remaining details for the incoming server
You can set the following options to configure incoming email:
Call Template Select the call template to be used when a call is logged from an incoming email originating from this mail server. The details specified in the template are used to populate the fields of the call. This list only displays call templates for which an Analyst or group has been assigned, to ensure that any call logged as a result of an incoming email is forwarded to an Analyst or group in the system.
Default Logging Analyst Specify the Analyst to be used as the Logging Analyst of any call logged by incoming email when either the Use Linked Analyst option is cleared or the Use Linked Analyst option is selected but the email was sent from a User only (that is, a person flagged as a User but not as an Analyst). Template Person records cannot be set as the Default Logging Analyst. If you leave this field blank, the logging Analyst will be the person who sent the email. Refer to the notes on how a logging Analyst is determined for more details.
Use Linked Analyst Select this option if you want the Analyst who sent the email logging the call to be the Logging Analyst. If the person who sent the email is flagged only as a User, the logging Analyst will be the Analyst specified in the Default Logging Analyst field. If this option is cleared, the logging Analyst of any call generated from this incoming email server will be the Analyst specified in the Default Logging Analyst field. If you want the logging Analyst to always be the one specified in the Default Logging Analyst field, clear Use Linked Analyst for this incoming email account. Refer to the notes on how a logging Analyst is determined for more details.
Send Auto Reply Select this option if you want an automatically generated email response to be sent to any person who sends an email to this email server (for example, to log a call).
Log New Call on Invalid Number Select this option if you want a new call to be logged whenever the email server receives an incoming email with a recognized format but an invalid call number.
Update Closed Calls Enables ASM Core to add a note to a closed call when this server receives an incoming email to update the call. An email reply will be sent back to the sender stating “Call No <call number> has been updated by ASM Core”. Clearing this option will not add a note to the closed call and send back a reply stating “Call No <call number> already closed and has not been updated”.
Reopen Closed Calls Enables ASM Core to reopen a closed call when this server receives an incoming email with the call number in the subject line, in a recognized format, and the specified call is closed. Update Closed Calls must be selected to enable this option.
Update Closed Tasks/Requests Enables ASM Core to add a note to a closed task or request when this server receives an incoming email to update the task or request. An email reply will be sent back to the sender stating the task or request "has been updated by ASM Core”. Clearing this option will not add a note to the closed call, but ASM will send back a reply stating the task or request is "already closed and has not been updated”.
On Reopening of Calls Select one of the following options to determine what happens to a call when it is reopened from incoming email.
Assign to Analyst/Group Assigned on Template forwards the reopened call to the analyst/group defined in the template selected in Call Template
Assign to Analyst Sending Email forwards the call to the analyst who sent the email that caused the call to reopen. If the person who sent the email does not have Analyst ticked in their Person record, the call is forwarded to the group selected in If none then assign to IPK Group.
Assign to Logging Analyst forwards the reopened call to the analyst who originally logged it. If the person who logged the call does not have Analyst selected in their Person record, the call is forwarded to the group selected in If none then assign to IPK Group.
Assign to Default IPK Group Below
If none then assign to IPK Group - select the group the reopened call is to be assigned to if none of the options above are selected, or if the conditions cannot be met.
Create New Calls Anonymously Select this option if you want to allow creation of calls from email addresses not yet in the system. In this circumstance, a new Person record is created and used as the User for the call unless Use Default User for Anonymous Email is selected.
Update Calls Anonymously Allows the update of calls from email addresses not yet in the system. In this circumstance, a new Person record is created and used as the User performing the update action on the call unless Use Default User for Anonymous Email is selected.
Close Calls Anonymously Allows the closure of calls from email addresses not yet in the system. In this circumstance, a new Person record is created and used as the User closing the call unless Use Default User for Anonymous Email is selected.
Use Default User for Anonymous Email Select a User record to use for all anonymous incoming email actions. When this option is selected new Person records are not created if the sender's email address does not exist in the system. Enabling the ability to allow messages from external email addresses increases the risk of unwanted updates to the call records in the system, including from unauthorized and SPAM type email addresses.
Add Email Message as EML Attachment - The default option. It will upload the email as an eml file along with the first level of attachments on the email. It will not loop through .eml or .msg files attached to the email and process their attachments.
Add Email Message as EML Attachment without Uploading Contained Attachments - This option will only upload the email as an eml file. It will not process any attachments in the email.
Preserve HTML Formatting in History Select this option if you want the history of calls, requests, or tasks being updated from incoming email to display the HTML formatting from the incoming email. When not selected, the incoming email is recorded in the history in plain text. Plain text emails appear as plain text in the history. If Plain Text is selected as the Default Format on the Email Settings window, the incoming email appears as plain text in history.
Populate Call Title From Email Subject
Available as of 10.6.8.14253
Enables setting the email subject as the title of the call/ticket.
To have the call title reflect the subject of the email that was sent to ASM, you will need to add the "Call Title" field to the target screen in ASM Screen Designer.
Subsequent Emails processed for the Call will not update the Call Title field.
The Call Title Field can still be manually updated by an Analyst or entered by the Analyst during the lifecycle of the call
Add Recipients as Stakeholders
Starting HERMES 10.2025.Q4 (10.6.9 GA Release)
Administrators can configure the system to automatically add email recipients as either "Followers" or "Email Recipient" stakeholder types for the outgoing/incoming emails . When the new setting is enabled, recipients will be assigned the selected role and granted the associated notifications and access. Followers will have full notification access and can manage followed entities from the portal, while Email Recipients will only receive manual notifications.

6. Test Connectivity
Once Outgoing and Incoming Email has been configured you should test connectivity by
Using the Test button in the toolbar
Once the test is successful, test again by sending and receiving email via the configured mail servers.
FAQ
Resource could not be discovered
This probably means the email address is not spelled correctly. You should double check the spelling of the email domain name. It might also mean that the associated account does not have email enabled.
Access Denied
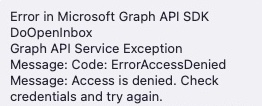
This is likely because Azure has not been configured for the correct roles and permission through the API.
Last updated
Was this helpful?
